
This guide explains how to set up MariaDB high-availability cluster for the database using the Galera library, which provides a virtual mater-to-master three-node cluster running on Debian or Ubuntu Linux.
Contents
- 1 Software and hardware requirements
- 2 What is the Galera cluster for MySQL and MariaDB?
- 3 Configuring apt repo to grab the latest stable MariaDB
- 4 Running mysql_secure_installation
- 5 What are State Snapshot Transfers (SST) under the MariaDB Galera cluster?
- 6 Tuning the MariaDB server
- 7 Creating TLS/SSL certificates for Galera cluster
- 7.1 Create the CA certificate
- 7.2 Create the server TLS/SSL certificate
- 7.3 Create the client TLS/SSL certificate
- 7.4 Verifying the certificates
- 7.5 Configuring MariaDB server and client for TLS on mysql1 host
- 7.6 Set up correct permission on certificates
- 7.7 Restarting the service on the mysql1 host
- 7.8 Testing TLS connectivity
- 7.9 Installing certificates on mysql2 and mysql3 hosts
- 7.10 Configuring TLS connection on mysql2 and mysql3 hosts
- 8 Firewall configuration
- 9 Setting up replication using Galera library
- 10 A note about the client
- 11 Summing up
Software and hardware requirements
- Minimum three VMs running at cloud providers or bare metal servers in same zone or data center. Always keep an ODD number of servers (at least 3) when all the servers are in the same zone or data center. Please note that the MariaDB Galera cluster can exist between two or more zones/data centers. Galera Cluster requires server hardware for a minimum of three nodes. If your cluster runs on a single switch, use three nodes. If your cluster spans switches, use three switches. If your cluster spans networks, use three networks. If your cluster spans data centers, use three data centers. This ensures that the cluster can maintain a Primary Component in the event of network outages.
- Ubuntu 20.04 or Debian 10/11 Linux LTS release. The instructions will not work on other operating systems such as FreeBSD or other Linux distros such as RHEL/SUSE due to different tools (e.g., firewall). However, one can always adopt it.
- MariaDB server with Galera library on each VM. The cluster is made of two components (replication engine called Galera and database called MariaDB).
- The MariaDB cluster is protected using password-based authentication, TLS, VLAN/VPC, and firewall for security and privacy. The cluster will not accept any traffic from the Internet or public interfaces at all.
What is the Galera cluster for MySQL and MariaDB?
- Galera cluster is nothing but a library for transactional databases. It enables multi-master (multi-primary) replication. There is no slave (secondary) server running.
- Users or client apps can write and read to any node, and changes will get replicated instantly. Hence, no need to update your app to deal with reading and write splitting.
- Synchronous replication means no slave lag, and no data is lost at node crash.
- No concept or additional apps are needed to deal with master-slave and failover operations or VIP (virtual IP) use. In other words, no need to set up VIP or failover. However, one can set up VIP, HAProxy, or database proxy if the need arises.
- Add additional nodes on the fly.
- Support InnoDB, which is the most popular storage engine.
- Galera cluster is optimized for WAN, too, as it only sends traffic when transaction commit occurs. Also, the transaction is sent to each data center only once when using WAN.
- The cluster supports full traffic encryption for security reasons.
Galera Cluster Limitations
This cluster has a few limitations:
- Galera Cluster requires the InnoDB storage engine. Any other storage engine won’t work. There is, however, experimental support for MyISAM, but it is not stable yet.
- Any writes to other MariaDB table types, including system (mysql.*) tables, are not replicated. But, this limitation excludes DDL statements such as CREATE USER, which implicitly modify the mysql.* tables — those are replicated. For example, the following DDL statements do replicate at the statement level:
CREATE USER 'vivek'@'localhost'
  IDENTIFIED BY 'my_password';
GRANT ALL ON salesdb.* TO 'vivek'@'localhost';
However, if you were to issue a statement like as follows the changes would not replicate:
INSERT INTO mysql.user (Host, USER, Password)
   VALUES ('localhost', 'vivek', 'my_password');
- Do not use tables without a primary key. When tables lack a primary key, rows can appear in different order on different nodes in your cluster. As such, queries like SELECT…LIMIT… can return different results. Additionally, on such tables the DELETE statement is unsupported.
- See MariaDB Galera Cluster limitations page for more info.
Prerequisites
All commands and configurations need to be typed as the root user. However, MariaDB runs as a mysql user. To gain root access, type any one of the following commands:
$ sudo -i

## OR ##

$ su -
For the rest of the tutorial, I will not use sudo or su. Next, apply all patches:
apt update

apt -y upgrade

## Why reboot? Because I got a new Linux kernel upgraded installed. ##

reboot
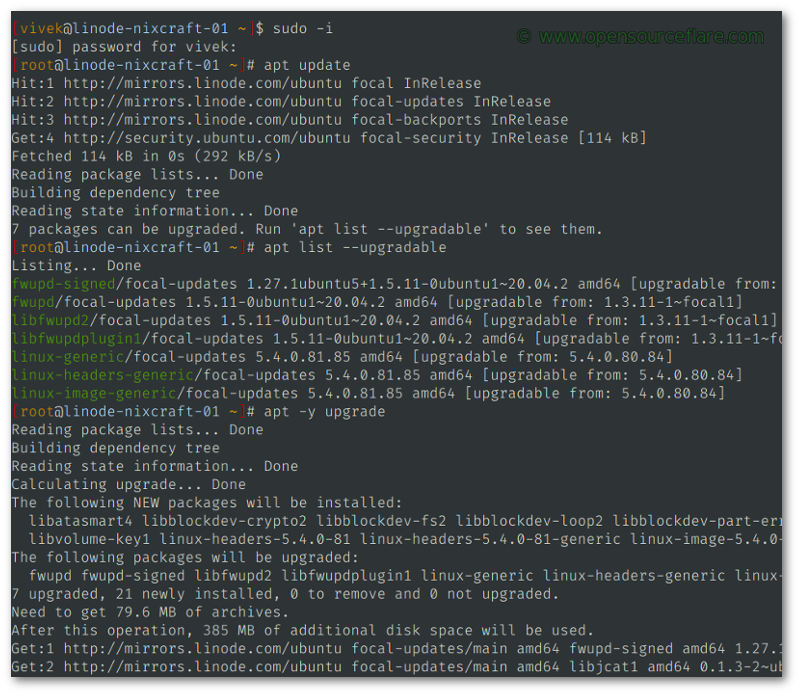
Patching and rebooting the Linux server
Update /etc/hosts file
Edit the /etc/hosts file as follows on all three hosts:
172.0.0.1	mysql1
172.0.0.2	mysql2
172.0.0.3	mysql3
Again, for the rest of the guide, I will use hostnames. Feel free to use IPs and names as per your preferences and VPC (Amazon Virtual Private Cloud) or VLAN (virtual LAN) setup. Verify connectivity using bash for loop and ping command:
grep mysql /etc/hosts

for i in mysql{1..3}
do
  ping -q -c4 $i
done
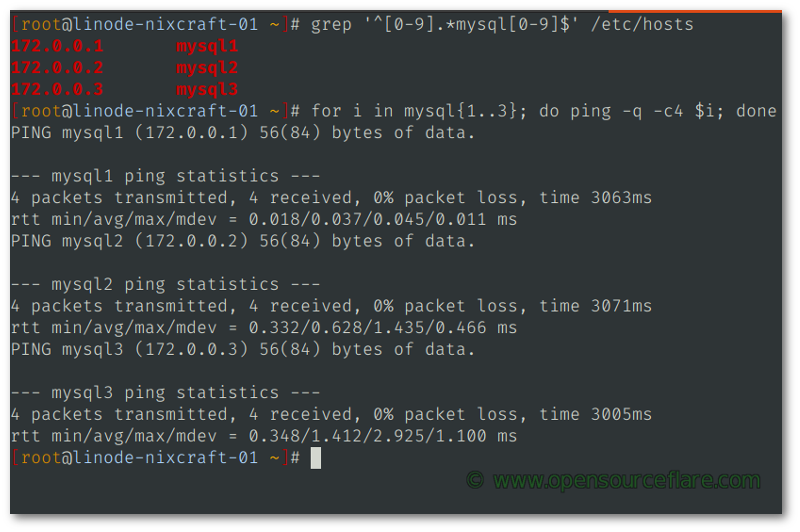
Make sure VLAN or VPC working and there is no packet loss
Enable ssh keys
Also, enable ssh-key based login between three nodes to copy TLS/SSL certificates created on mysql1 easily. For instance, we can do (see below “Creating TLS/SSL certificates for Galera cluster” for more info):
rsync -avr /etc/mysql/ssl root@mysql2:/etc/mysql/ssl/

rsync -avr /etc/mysql/ssl root@mysql3:/etc/mysql/ssl/
On the mysql1 host type:
ssh-keygen -t ed25519
Make sure TCP port 22 is opened for the ssh session using the ufw command as follows on both mysql2 and mysql3 hosts:
#
# SET UP VLAN/VPC CIDR  and Interface
# Type on mysql2 and mysql3 hosts
#
VLAN_CIDR='172.0.0.0/24'
VALN_IF='eth1'
ufw allow in on "${VALN_IF}" from "${VLAN_CIDR}" to any port 22 proto tcp comment 'Open TCP SSH PORT for VLAN/VPC'
Then install ssh keys:
# type on the mysql1 host
ssh-copy-id -i ~/.ssh/id_ed25519.pub mysql2
ssh-copy-id -i ~/.ssh/id_ed25519.pub mysql3
Why is VLAN or VPC needed?
This guide will not cover how to set up VPC or VLAN. But, it would be best if you used some private network that is not open to everyone. When VLAN is enabled, you get private and secure communications between your cluster. In addition, by default, traffic is not routed directly to the Internet or other customers in the same LAN. Our MariaDB and application (Nginx/Apache/PHP/Python/Perl) will talk over VLAN for security and privacy when data is transmitted between these three nodes. We will also add password authentication for our nodes, including TLS. We don’t want to give anyone any chances to snoop around.
Configuring apt repo to grab the latest stable MariaDB
Head over to MariaDB to find out apt repo and run commands as per your Ubuntu/Debian distro on all three hosts.
Ubuntu 20.04 LTS
apt-get install software-properties-common
apt-key adv --fetch-keys 'https://mariadb.org/mariadb_release_signing_key.asc'
add-apt-repository 'deb [arch=amd64,arm64,ppc64el] https://mirror.jaleco.com/mariadb/repo/10.6/ubuntu focal main'
Debian 10
apt-get install software-properties-common dirmngr
apt-key adv --fetch-keys 'https://mariadb.org/mariadb_release_signing_key.asc'
add-apt-repository 'deb [arch=amd64,arm64,ppc64el] https://mirror.jaleco.com/mariadb/repo/10.6/debian buster main'
Debian 11
apt-get install software-properties-common dirmngr
curl -LsSO https://mariadb.org/mariadb_release_signing_key.asc
chmod -c 644 mariadb_release_signing_key.asc
mv -vi mariadb_release_signing_key.asc /etc/apt/trusted.gpg.d/
add-apt-repository 'deb [arch=amd64,arm64,ppc64el] https://mirror.jaleco.com/mariadb/repo/10.6/debian bullseye main'
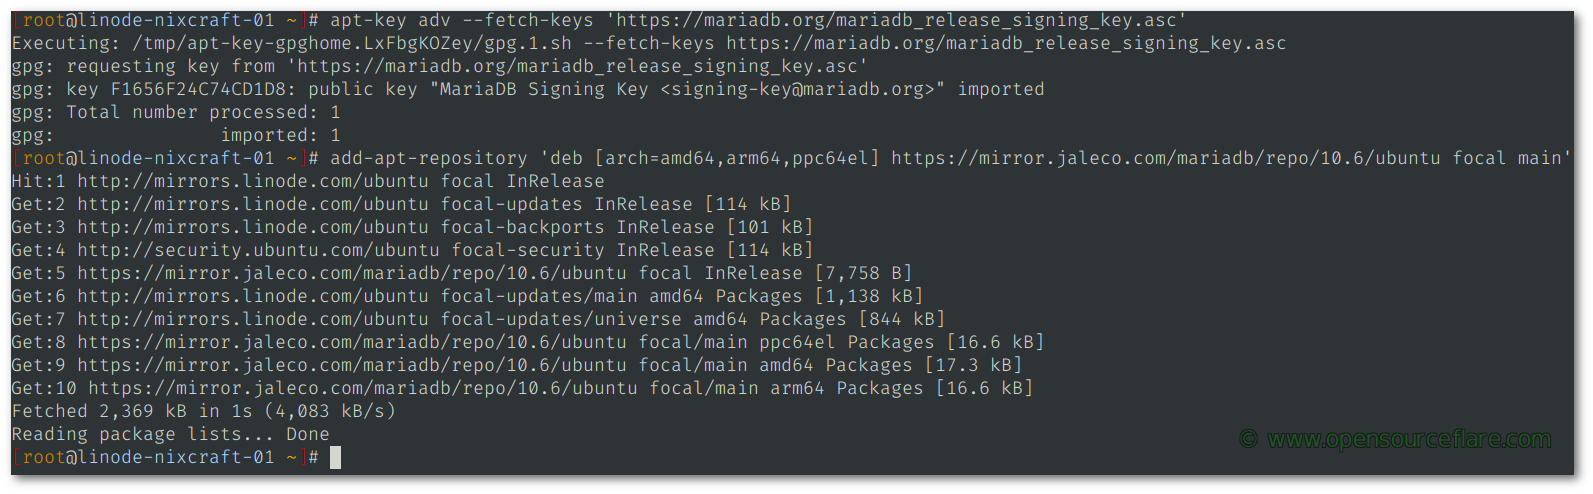
apt repo configured on Ubuntu 20.04 LTS (click to enlarge)
Installing MairaDB 10.6
If you are trying to migrate from standalone MariaDB or RDS, make sure you choose the same version for the MariaDB cluster. In this example, I am using MariaDB 10.6 stable. But, you must match the version to avoid headaches and incompatibility when migrating. In theory, it is possible to jump between Oracle MySQL and MariaDB, but my experience shows some edge cases might create an issue. I learned this hard way. Hence a word of warning.
Update repo and install the latest MariaDB server including Galera 4 lib:
apt update

apt install mariadb-server galera-4 mariadb-backup python3-openssl
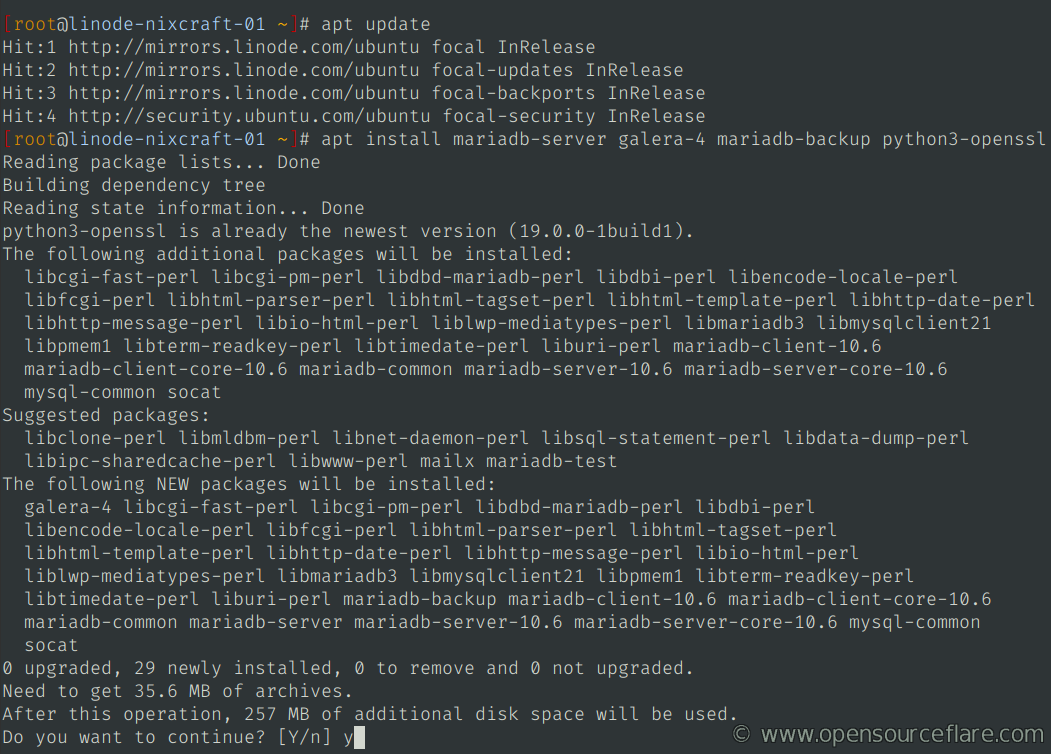
Essential files and TCP ports for MariaDB cluster building
- The /etc/mysql/my.cnf symlinks to /etc/mysql/mariadb.cnf file and reason why all the rest is read in the following order.
- The /etc/mysql/mariadb.cnf file set global defaults.
- The /etc/mysql/conf.d/*.cnf files to set global options
- The /etc/mysql/mariadb.conf.d/*.cnf files to set MariaDB-only options.
- The ~/.my.cnf file to set user-specific options.
- The TCP port # 3306 is opened by the MariaDB server, and all clients will use it to send read and write requests.
- The TCP port # 4567 is opened by the Galera and will use to replicate mysql data. See the firewall section below for additional TCP and UDP ports requirements.
- The /etc/mysql/mariadb.conf.d/50-server.cnf file used by the MariaDB server.
- The /etc/mysql/mariadb.conf.d/50-client.cnf file used by the MariaDB client.
- The /etc/mysql/mariadb.conf.d/60-galera.cnf file used by the Galera server for traffic replication.
- MariaDB server log files are at /var/log/mysql/ location.
Controlling MariaDB daemon command
Use the systemctl command to control both MariaDB and Galera:
## Syntax ##

systemctl {start|stop|restart|status} mariadb.service

systemctl is-enabled mariadb.service #<- Is the service enabled at boot time?

systemctl restart mariadb.service #<- Restart the service

systemctl stop mariadb.service #<- Stop the service

systemctl start mariadb.service #<- Start the service

# Get the service status including recent messages/errors if any

systemctl status mariadb.service
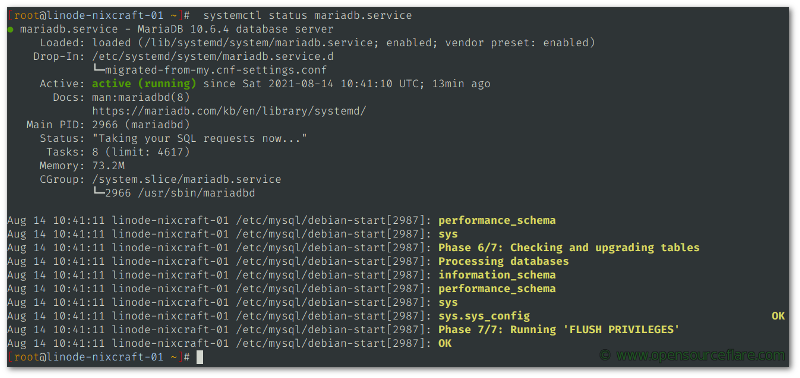
MariaDB is running on Ubuntu 20.04 LTS
Running mysql_secure_installation
The following program enables you to improve the security of your MariaDB installation. So run it on all three nodes:
mysql_secure_installation
You can set a password for root accounts and remove root accounts accessible from outside the localhost. Also, it can remove anonymous-user accounts, including the test database, which anonymous users can access by default. Pressing the [Enter] key will accept all security defaults:
NOTE: RUNNING ALL PARTS OF THIS SCRIPT IS RECOMMENDED FOR ALL MariaDB
      SERVERS IN PRODUCTION USE!  PLEASE READ EACH STEP CAREFULLY!

In order to log into MariaDB to secure it, we'll need the current
password for the root user. If you've just installed MariaDB, and
haven't set the root password yet, you should just press enter here.

Enter current password for root (enter for none):
OK, successfully used password, moving on...

Setting the root password or using the unix_socket ensures that nobody
can log into the MariaDB root user without the proper authorisation.

You already have your root account protected, so you can safely answer 'n'.

Switch to unix_socket authentication [Y/n]
Enabled successfully!
Reloading privilege tables..
 ... Success!


You already have your root account protected, so you can safely answer 'n'.

Change the root password? [Y/n]
New password:
Re-enter new password:
Password updated successfully!
Reloading privilege tables..
 ... Success!


By default, a MariaDB installation has an anonymous user, allowing anyone
to log into MariaDB without having to have a user account created for
them.  This is intended only for testing, and to make the installation
go a bit smoother.  You should remove them before moving into a
production environment.

Remove anonymous users? [Y/n]
 ... Success!

Normally, root should only be allowed to connect from 'localhost'.  This
ensures that someone cannot guess at the root password from the network.

Disallow root login remotely? [Y/n]
 ... Success!

By default, MariaDB comes with a database named 'test' that anyone can
access.  This is also intended only for testing, and should be removed
before moving into a production environment.

Remove test database and access to it? [Y/n]
 - Dropping test database...
 ... Success!
 - Removing privileges on test database...
 ... Success!

Reloading the privilege tables will ensure that all changes made so far
will take effect immediately.

Reload privilege tables now? [Y/n]
 ... Success!

Cleaning up...

All done!  If you've completed all of the above steps, your MariaDB
installation should now be secure.

Thanks for using MariaDB!
What are State Snapshot Transfers (SST) under the MariaDB Galera cluster?
A State Snapshot Transfers (SST) is nothing but a method used by a cluster for transferring a full data copy from one node to another. New nodes also use it to synchronize their data with a node already part of the cluster. Mariabackup is the recommended backup method to use with the MariaDB cluster.
How to set up SST with as password
NOTE: This is for information only, and this tutorial uses a UNIX socket without a password for SST, as described in the next section. So you may want to jump to the next section and skip this one.
When a new node joins a cluster, it will request data from the cluster. A donor node will use a State Snapshot Transfer (SST) method to provide a complete data copy to the new joining node or the joiner. It is one of the methods that does not block the donor node. Hence, recommended method and set as follows in /etc/mysql/mariadb.conf.d/60-galera.cnf option on all nodes:
wsrep_sst_method=mariabackup
The mariabackup SST method work with or without authentication. The password is stored in a plain-text format in /etc/mysql/mariadb.conf.d/50-server.cnf file as follows on each node (replace my_SST_password with actual password):
wsrep_sst_auth = mariabackup:my_SST_password
Also, mariabackup connects locally on the donor node to perform the backup, so the following user should be sufficient and need to run the following SQL statements on all nodes:
CREATE USER 'mariabackup'@'localhost' IDENTIFIED BY 'my_SST_password';
GRANT RELOAD, PROCESS, LOCK TABLES, REPLICATION CLIENT ON *.* TO 'mariabackup'@'localhost';
How to set up passwordless SST authentication using Unix socket
Do not skip this step. Else the cluster will not work without SST. Think of it as the secret sauce.
A State Snapshot Transfers (SST) is needed for our cluster. It works with or without authentication, as explained earlier. For our setup, I will use the unix_socket authentication plugin for the user account that performs SSTs. Hence, no need to set up a plain-text password in the wsrep_sst_auth config option. Run the following SQL queries on the mysql1, mysql2 and mysql3 hosts:
DROP USER IF EXISTS 'mysql'@'localhost';
CREATE USER 'mysql'@'localhost' IDENTIFIED VIA unix_socket;
GRANT RELOAD, PROCESS, LOCK TABLES, REPLICATION CLIENT ON *.* TO 'mysql'@'localhost';
FLUSH PRIVILEGES;
QUIT
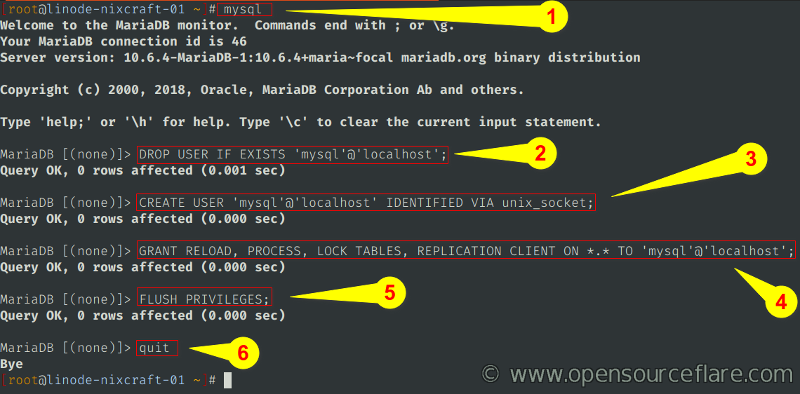
Tuning the MariaDB server
Edit the /etc/mysql/mariadb.conf.d/50-server.cnf file on the mysql1, mysql2 and mysql3 hosts. Then set up the following under [mysqld] section replacing it with your VLAN/VPC IP address as per host:
# Binding to VLAN/VPC IP address is a security feature and avoids
# exposing MariaDB to anyone over the Internet.
# mysql1 setting
bind-address = 172.0.0.1
port = 3306
Where:
- bind-address = 172.0.0.1 – Set mysql1 VLAN/VPC IP address binding.
- port = 3306 – Set up default TCP port for the server.
Optinal settings
Also update the [mysqld] section as follows on all three nodes I commented out config for ease of understanding but do not use the following values blindly. Do read documentations. I provided here for reference purpose so that you will know what to tune. If in doubt, leave the following tuning section and start making changes when your cluster grows with time.
# Maximum size in bytes of a packet or a generated/intermediate string. #
max_allowed_packet = 1G

# Limit to the number of successive failed connects from a host before the host is blocked from making further connections. #
max_connect_errors = 1000000

# only IP addresses are used for connections and skip dns and may speed up busy servers #
skip_name_resolve

#
# Innodb tunning for mysqld
# Careful with values, read the docs
#
innodb_buffer_pool_instances = 4
innodb_buffer_pool_size = 4G
innodb_file_per_table = 1
innodb_flush_log_at_trx_commit = 0
innodb_flush_method = O_DIRECT
innodb_log_buffer_size = 16M
innodb_log_file_size = 1G
innodb_stats_on_metadata = 0
innodb_read_io_threads  = 64
innodb_write_io_threads = 64
# Buffer tunning
innodb_sort_buffer_size         = 2M
join_buffer_size = 4M
read_buffer_size = 3M
read_rnd_buffer_size = 4M
sort_buffer_size = 4M

#
# Connection settings for mysqld
#
max_connections = 100   # default 151 but i reduced to avoid RAM consumption
back_log = 512
thread_cache_size = 100
thread_stack = 192K
interactive_timeout = 180
wait_timeout = 180

#
# Table cache settings
# NOTE: open file limted created using the systemd unit (see below) on Ubuntu/Debian Linux
#
table_definition_cache = 40000
table_open_cache = 40000

#
# Log stuff for debug purpose
#
log_error = /var/lib/mysql/mysql_error.log
log_queries_not_using_indexes = 1
long_query_time = 5
slow_query_log  = 0 # MUST BE disabled for production boxes or turn it on for debug
slow_query_log_file = /var/lib/mysql/mysql_slow.log
Do check the Galera Innoptimizer tool on Github and this blog post about truning a MariaDB Galera cluster for performance.
Creating TLS/SSL certificates for Galera cluster
Make a directory named ssl in /etc/mysql/ directory using the mkdir command and set mode, owner:group for the ssl directory. Type all commands on mysql1 host:
cd /etc/mysql
mkdir ssl
chmod -v 0755 ssl
chown -v mysql:mysql ssl
cd ssl
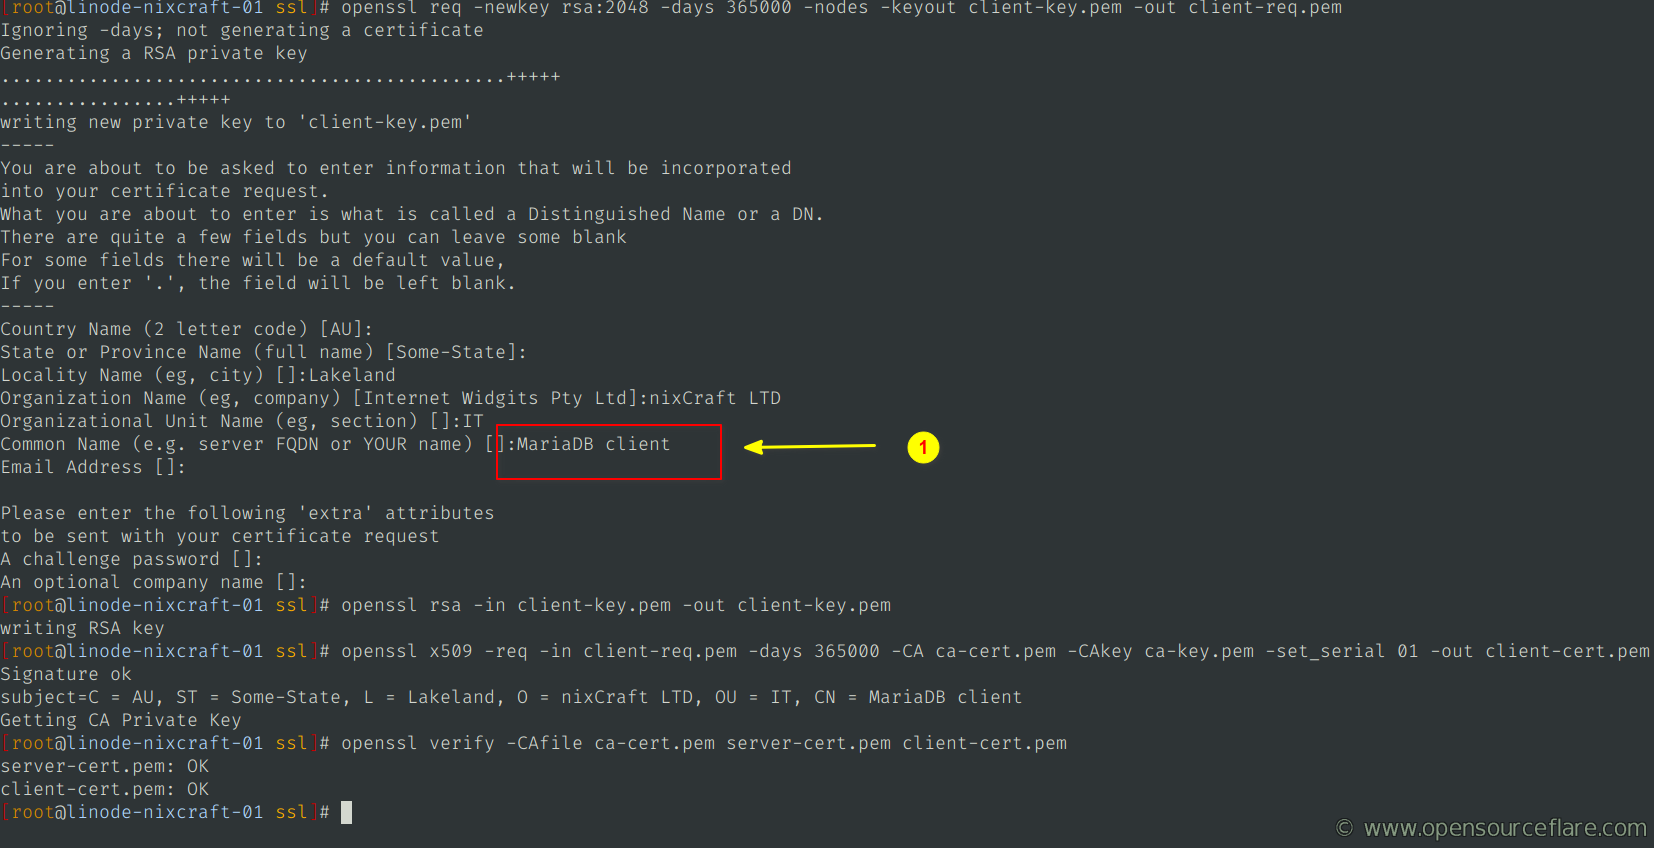
Caveat: Common Name value used for the server and client certificates/keys must each differ from the Common Name value used for the CA certificate. To avoid any issues, I am setting them as follows. Otherwise, you will get certification verification failed error. For example:
- CA common Name : MariaDB admin
- Server common Name: MariaDB server
- Client common Name: MariaDB client
Create the CA certificate
Run
openssl genrsa 2048 > ca-key.pem
Generate the certificate using that key:
openssl req -new -x509 -nodes -days 365000 -key ca-key.pem -out ca-cert.pem
Verify it:
ls -l /etc/mysql/ssl/
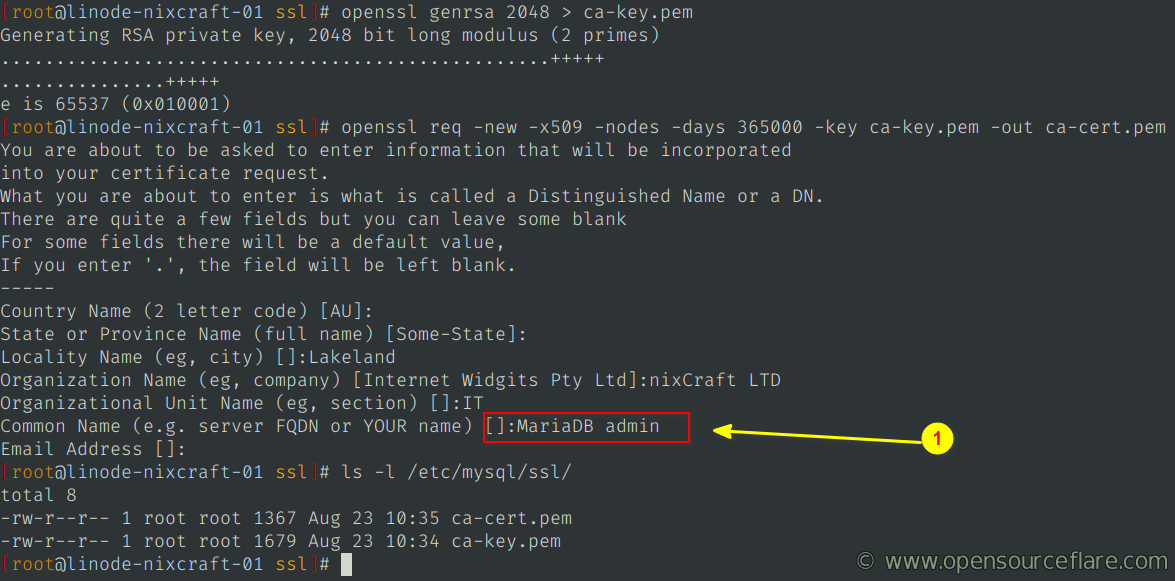
I am going to use both files to generate the server and client certificates.
Create the server TLS/SSL certificate
Execute the following three commands:
# openssl req -newkey rsa:2048 -days 365000 -nodes -keyout server-key.pem -out server-req.pem

# openssl rsa -in server-key.pem -out server-key.pem

## Verify it ##

# openssl x509 -req -in server-req.pem -days 365000 -CA ca-cert.pem -CAkey ca-key.pem -set_serial 01 -out server-cert.pem
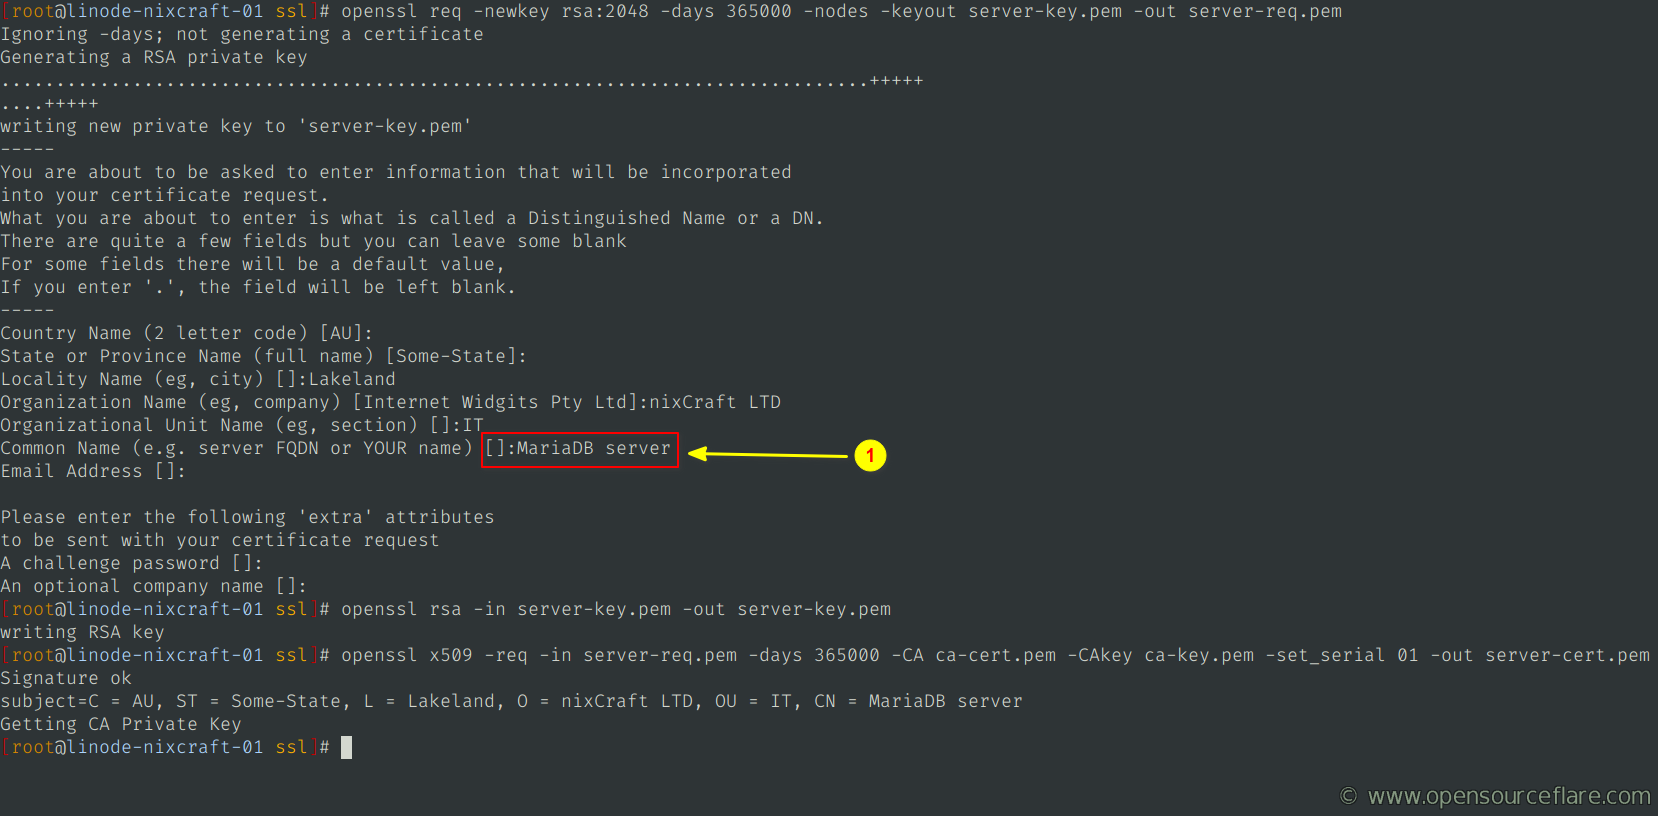
Create the client TLS/SSL certificate
Finally, make the client TLS certificate:
# openssl req -newkey rsa:2048 -days 365000 -nodes -keyout client-key.pem -out client-req.pem

# openssl rsa -in client-key.pem -out client-key.pem

# openssl x509 -req -in client-req.pem -days 365000 -CA ca-cert.pem -CAkey ca-key.pem -set_serial 01 -out client-cert.pem
Verifying the certificates
Run:
openssl verify -CAfile ca-cert.pem server-cert.pem client-cert.pem
The following message confirms that we have successfully created server and client TLS certificates. If you don’t get “OK,” then you need to re-create the certificate again. The error happens when the common name is not set up correctly or other data is missing when running OpenSSL commands:
server-cert.pem: OK
client-cert.pem: OK
Configuring MariaDB server and client for TLS on mysql1 host
Edit the server config, run:
vim /etc/mysql/mariadb.conf.d/50-server.cnf
You need to set the path to the server’s TLS certificate for enabling TLS support on MariaDB:
Make sure you use the absolute path, not a relative path and must be under the [mysqld] section.
ssl-ca=/etc/mysql/ssl/ca-cert.pem
ssl-cert=/etc/mysql/ssl/server-cert.pem
ssl-key=/etc/mysql/ssl/server-key.pem
tls_version = TLSv1.2,TLSv1.3
require-secure-transport = on
Where server options are as follows:
- ssl-ca=/etc/mysql/ssl/ca-cert.pem : Defines a path to a PEM file that should contain one or more X509 certificates for trusted Certificate Authorities (CAs) to use for TLS.
- ssl-cert=/etc/mysql/ssl/server-cert.pem : Defines a path to the X509 certificate file to use for TLS.
- ssl-key=/etc/mysql/ssl/server-key.pem : Defines a path to a private key file to use for TLS.
- tls_version = TLSv1.2,TLSv1.3 : : Set a comma-separated list of TLS protocol versions. All other TLS protocol versions will not be permitted. For example, only accept TLSv1.2 and TLSv1.3 version and deny everything else.
- require-secure-transport = on : All connections attempted using insecure transport will be rejected. Secure transports are SSL/TLS, Unix sockets or named pipes.
Next edit the client config file named /etc/mysql/mariadb.conf.d/50-client.cnf:
vim /etc/mysql/mariadb.conf.d/50-client.cnf
Edit/Append the client TLS certificates under the [client] section:
ssl-ca=/etc/mysql/ssl/ca-cert.pem
ssl-cert=/etc/mysql/ssl/client-cert.pem
ssl-key=/etc/mysql/ssl/client-key.pem
Save and close the file. Next, you must copy /etc/mysql/ssl/ca-cert.pem, /etc/mysql/ssl/client-cert.pem, and /etc/mysql/ssl/client-key.pem to all of your clients so that you can access the server using the TLS. For example:
BASE="/etc/mysql/ssl"
rsync ${BASE}/ca-cert.pem ${BASE}/client-cert.pem ${BASE}/client-key.pem \
user@www-client-1:/etc/mysql/ssl
Set up correct permission on certificates
Run the chown command:
chown -Rv mysql:mysql /etc/mysql/ssl/
The -R option operate on files and directories recursively. The -v option output a diagnostic for every file processed as follows on screen:
changed ownership of '/etc/mysql/ssl/server-req.pem' from root:root to mysql:mysql
changed ownership of '/etc/mysql/ssl/server-key.pem' from root:root to mysql:mysql
changed ownership of '/etc/mysql/ssl/server-cert.pem' from root:root to mysql:mysql
changed ownership of '/etc/mysql/ssl/ca-key.pem' from root:root to mysql:mysql
changed ownership of '/etc/mysql/ssl/client-key.pem' from root:root to mysql:mysql
changed ownership of '/etc/mysql/ssl/client-cert.pem' from root:root to mysql:mysql
changed ownership of '/etc/mysql/ssl/client-req.pem' from root:root to mysql:mysql
changed ownership of '/etc/mysql/ssl/ca-cert.pem' from root:root to mysql:mysql
ownership of '/etc/mysql/ssl/' retained as mysql:mysql
Restarting the service on the mysql1 host
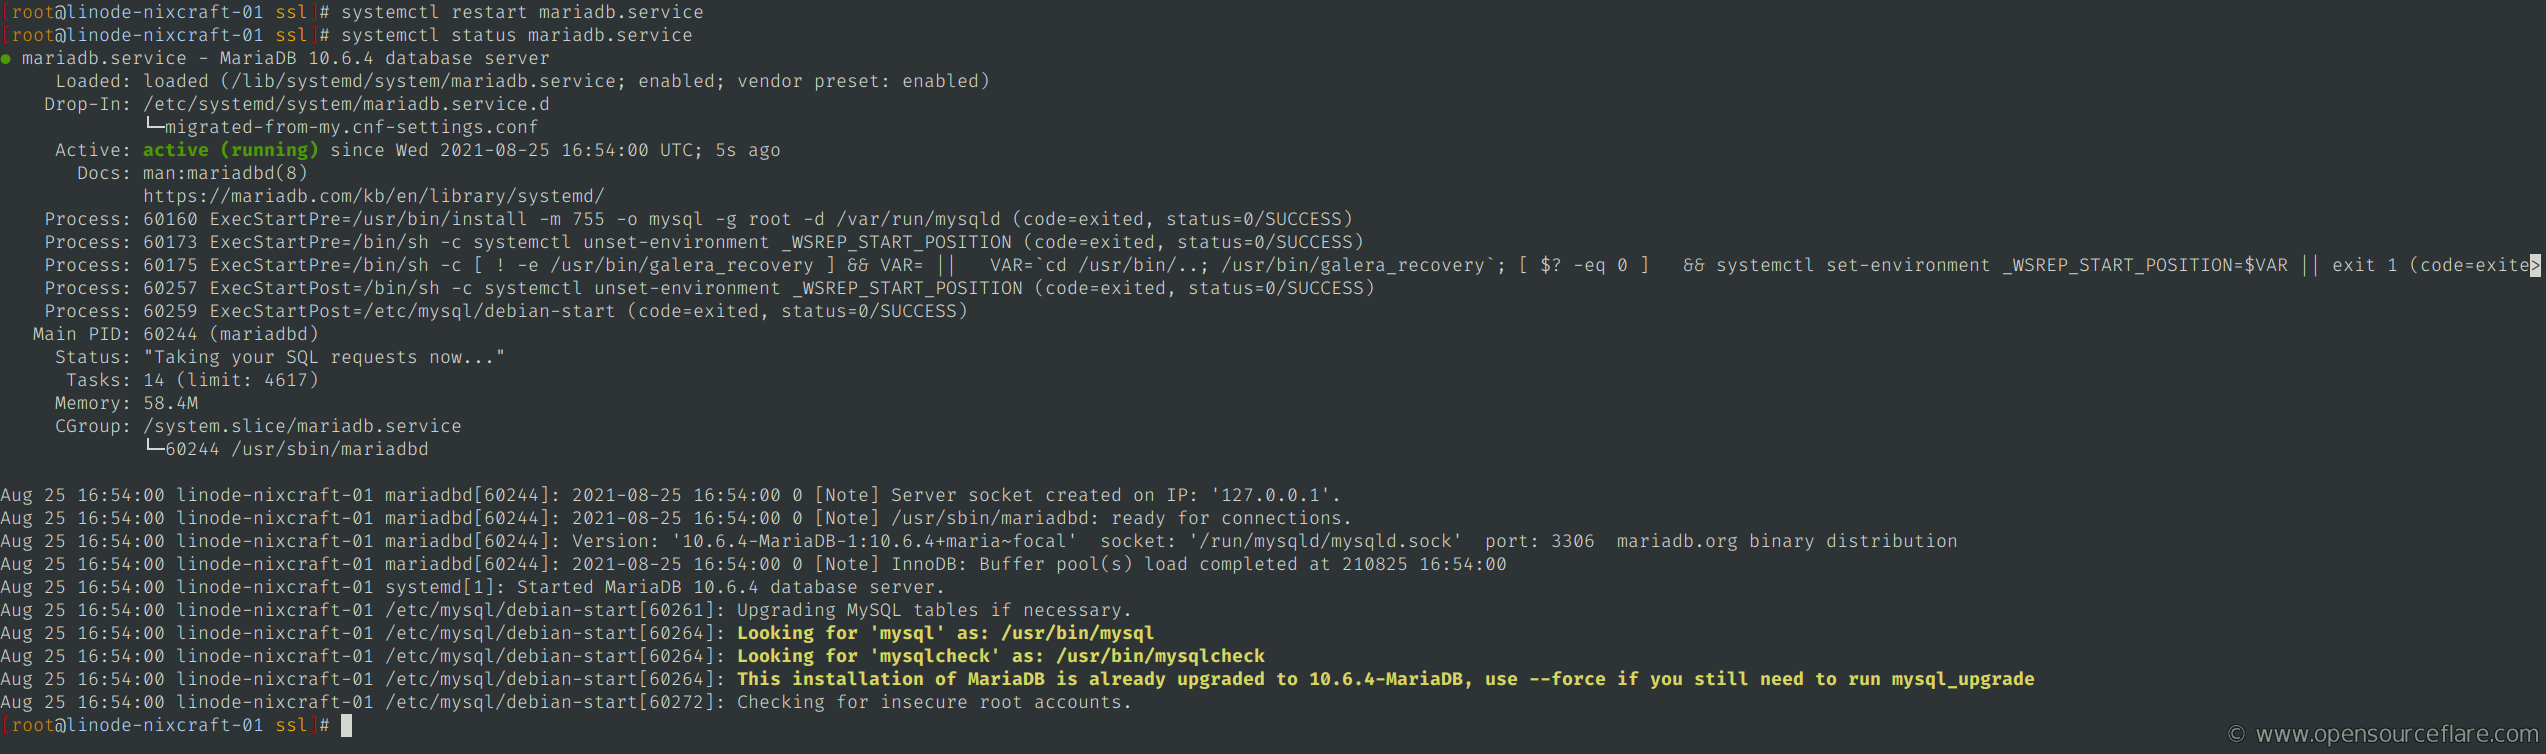
Again use the systemctl command to restart and view the service status:
systemctl restart mariadb.service

systemctl status mariadb.service
Click to enlarge
Testing TLS connectivity
Use the mysql command:
mysql

mysql -u root -h server_IP_hostname -p
Then run the STATUS and SHOW VARIABLES LIKE '%ssl%' statments at the MariaDB [(none)]> prompt:
MariaDB [(none)]> STATUS
Look for SSL option:
mysql  Ver 15.1 Distrib 10.6.4-MariaDB, for debian-linux-gnu (x86_64) using readline 5.2

Connection id:		33
Current database:
Current user:		root@localhost
SSL:			Cipher in use is TLS_AES_256_GCM_SHA384
Current pager:		stdout
Using outfile:		''
Using delimiter:	;
Server:			MariaDB
Server version:		10.6.4-MariaDB-1:10.6.4+maria~focal mariadb.org binary distribution
Protocol version:	10
Connection:		Localhost via UNIX socket
Server characterset:	utf8mb4
Db     characterset:	utf8mb4
Client characterset:	utf8mb3
Conn.  characterset:	utf8mb3
UNIX socket:		/run/mysqld/mysqld.sock
Uptime:			7 min 0 sec

Threads: 1  Questions: 70  Slow queries: 0  Opens: 33  Open tables: 26  Queries per second avg: 0.166
MariaDB [(none)]> SHOW VARIABLES LIKE '%ssl%';
Sample outputs (look for have_ssl and have_openssl):
+---------------------+--------------------------------+
| Variable_name       | Value                          |
+---------------------+--------------------------------+
| have_openssl        | YES                           |
| have_ssl            | YES                           |
| ssl_ca              | /etc/mysql/ssl/ca-cert.pem     |
| ssl_capath          |                                |
| ssl_cert            | /etc/mysql/ssl/server-cert.pem |
| ssl_cipher          |                                |
| ssl_crl             |                                |
| ssl_crlpath         |                                |
| ssl_key             | /etc/mysql/ssl/server-key.pem  |
| version_ssl_library | OpenSSL 1.1.1f  31 Mar 2020    |
+---------------------+--------------------------------+
Can we connect using outdated SSL3 or TLS1? First, check for TLS v 1/1.1/1.2/1.3 connectivity as follows using the openssl command client option:
openssl s_client -tls1 -connect localhost:3306

openssl s_client -tls1 -connect mysql1:3306

openssl s_client -tls1_2 -connect 172.0.0.1:3306

# Provide CA file, client certificates and connect using TLS 1.2 or 1.3 #

openssl s_client -CAfile /etc/mysql/ssl/ca-cert.pem \

-cert /etc/mysql/ssl/client-cert.pem \

-key /etc/mysql/ssl/client-key.pem \

-starttls mysql \

-tls1_2 \

-servername mysql1 \

-connect mysql1:3306
Sample session:
CONNECTED(00000003)
140022679426368:error:1408F10B:SSL routines:ssl3_get_record:wrong version number:../ssl/record/ssl3_record.c:331:
---
no peer certificate available
---
No client certificate CA names sent
---
SSL handshake has read 5 bytes and written 188 bytes
Verification: OK
---
New, (NONE), Cipher is (NONE)
Secure Renegotiation IS NOT supported
Compression: NONE
Expansion: NONE
No ALPN negotiated
SSL-Session:
    Protocol  : TLSv1.2
    Cipher    : 0000
    Session-ID:
    Session-ID-ctx:
    Master-Key:
    PSK identity: None
    PSK identity hint: None
    SRP username: None
    Start Time: 1629913279
    Timeout   : 7200 (sec)
    Verify return code: 0 (ok)
    Extended master secret: no
---
Installing certificates on mysql2 and mysql3 hosts
Run the following command on mysql1 host to copy /etc/mysql/ssl as follows:
rsync -av /etc/mysql/ssl root@mysql2:/etc/mysql/

rsync -av /etc/mysql/ssl root@mysql3:/etc/mysql/
Outputs:
sending incremental file list
ssl/
ssl/ca-cert.pem
ssl/ca-key.pem
ssl/client-cert.pem
ssl/client-key.pem
ssl/client-req.pem
ssl/server-cert.pem
ssl/server-key.pem
ssl/server-req.pem

sent 11,515 bytes  received 172 bytes  7,791.33 bytes/sec
total size is 10,878  speedup is 0.93
Configuring TLS connection on mysql2 and mysql3 hosts
Now that certificates are copied, edit the following files on both mysql2 and mysql3 hosts using a text editor:
# Type command on mysql1 host and ssh session enabled

# Edit remote files via scp in vim from mysql1 host

# The syntax is: vim scp://USER@server-name//absolute/path/to/config.file

vim scp://mysql2//etc/mysql/mariadb.conf.d/50-server.cnf
Edit/update as follows with mysql2 IP address too:
ssl-ca=/etc/mysql/ssl/ca-cert.pem
ssl-cert=/etc/mysql/ssl/server-cert.pem
ssl-key=/etc/mysql/ssl/server-key.pem
tls_version = TLSv1.2,TLSv1.3
require-secure-transport = on
bind-address = 172.0.0.2
port = 3306
Next edit host3 config file:
vim scp://mysql3//etc/mysql/mariadb.conf.d/50-server.cnf
Then edit/update as follows with mysql3 IP address too:
ssl-ca=/etc/mysql/ssl/ca-cert.pem
ssl-cert=/etc/mysql/ssl/server-cert.pem
ssl-key=/etc/mysql/ssl/server-key.pem
tls_version = TLSv1.2,TLSv1.3
require-secure-transport = on
bind-address = 172.0.0.3
port = 3306
Finally, edit the client config file on both mysql2 and mysql3 hosts:
vim scp://mysql2//etc/mysql/mariadb.conf.d/50-client.cnf

vim scp://mysql3//etc/mysql/mariadb.conf.d/50-client.cnf
Edit as follows under the [client] section:
ssl-ca=/etc/mysql/ssl/ca-cert.pem
ssl-cert=/etc/mysql/ssl/client-cert.pem
ssl-key=/etc/mysql/ssl/client-key.pem
Restart the service on both mysql2 and mysql3 hosts. For example:
ssh mysql2 "systemctl restart mariadb.service"

ssh mysql3 "systemctl restart mariadb.service"

# check status #

ssh mysql2 "systemctl status mariadb.service"

ssh mysql3 "systemctl status mariadb.service"
Verify TLS connectivity for both mysql1 and mysql2 hosts (type the following on the mysql1 host over ssh based session):
$ ssh mysql2 -- mysql -e 'STATUS'

$ ssh mysql3 -- mysql -e 'STATUS'

# USE Bash EOF to run mysql query on the remote host for verification #

$ ssh -t mysql2 <<EOF

mysql -e "SHOW VARIABLES LIKE '%ssl%'"

EOF

$ ssh -t mysql3 <<EOF

mysql -e "SHOW VARIABLES LIKE '%ssl%'"

EOF
Outputs indicating that TLS support loaded:
Variable_name	Value
have_openssl	YES
have_ssl	YES
ssl_ca	/etc/mysql/ssl/ca-cert.pem
ssl_capath
ssl_cert	/etc/mysql/ssl/server-cert.pem
ssl_cipher
ssl_crl
ssl_crlpath
ssl_key	/etc/mysql/ssl/server-key.pem
version_ssl_library	OpenSSL 1.1.1f  31 Mar 2020
So far, so good. TLS is an essential feature for data security during transmission. All three nodes of our cluster are in standalone mode, and TLS configured successfully. However, there is no replication set up yet, which we are going to do in the next section.
Firewall configuration
Before clusters talk to each other and clients connect to our database node, we need to open the following TCP and UDP ports:
- TCP/3306 – All mysql client requests accepted by this port. Also used by State Snapshot Transfer (SST) using mysqldump for backups.
- TCP/4567 and UDP/4567– All replication traffic handle by this port. Multicast replication uses both TCP and UDP transport on this port
- TCP/4444 Thse port is used for all other State Snapshot Transfer.
- TCP/4568 The port for Incremental State Transfer.
- eth1 – VLAN/VPC interface.
- CIDR – My sample CIDR 172.0.0.0/24 (VPC/VLAN). All my MariaDB nodes, including web servers, are on the same CIDR. Hence, we need to allow traffic between nodes and the CIDR. By default, ufw blocks all incoming traffic on all interfaces. Hence, opening ports from CIDR is essential. In other words, our firewall-config ensures that our cluster only accepts traffic from VLAN/VPC and avoids exposing the database to the Internet.
Without correct firewall rules, communication between the MariaDB Galera cluster will never take place. If you are new to ufw, see my guide from nixCraft about ufw on Ubuntu Linux 20.04 LTS.
So based upon the above information, my firewall rules are as follows for each cluster node. First, gain access to root account using the sudo command and then type commands.
mysql1 host firewall
# adjust the following as per your set up #
VLAN_MARIADB_IP="172.0.0.1"
VLAN_MARIADB_DESC="mysql1"
VLAN_IF="eth1"
VLAN_CIDR="172.0.0.0/24"
VLAN_MARIADB_PORT="3306"
VLAN_GALERA_PORT_1="4567"
VLAN_GALERA_PORT_2="4568"
VLAN_GALERA_PORT_3="4444"
ufw allow in on "${VLAN_IF}" from "${VLAN_CIDR}" to "${VLAN_MARIADB_IP}" port "${VLAN_MARIADB_PORT}" proto tcp comment "Open TCP MariaDB PORT on ${VLAN_MARIADB_DESC} host for cluster"
ufw allow in on "${VLAN_IF}" from "${VLAN_CIDR}" to "${VLAN_MARIADB_IP}" port "${VLAN_GALERA_PORT_1}" proto tcp comment "Open TCP Galera Replication PORT on ${VLAN_MARIADB_DESC} host for cluster"
ufw allow in on "${VLAN_IF}" from "${VLAN_CIDR}" to "${VLAN_MARIADB_IP}" port "${VLAN_GALERA_PORT_1}" proto udp comment "Open UDP Galera Replication PORT on ${VLAN_MARIADB_DESC} host for cluster"
ufw allow in on "${VLAN_IF}" from "${VLAN_CIDR}" to "${VLAN_MARIADB_IP}" port "${VLAN_GALERA_PORT_2}" proto tcp comment "Open TCP Galera Incremental State Transfer PORT on ${VLAN_MARIADB_DESC} host for cluster"
ufw allow in on "${VLAN_IF}" from "${VLAN_CIDR}" to "${VLAN_MARIADB_IP}" port "${VLAN_GALERA_PORT_3}" proto tcp comment "Open TCP Galera State Snapshot Transfer PORT on ${VLAN_MARIADB_DESC} host for cluster"
mysql2 host firewall
# adjust the following as per your set up #
VLAN_MARIADB_IP="172.0.0.2"
VLAN_MARIADB_DESC="mysql2"
VLAN_IF="eth1"
VLAN_CIDR="172.0.0.0/24"
VLAN_MARIADB_PORT="3306"
VLAN_GALERA_PORT_1="4567"
VLAN_GALERA_PORT_2="4568"
VLAN_GALERA_PORT_3="4444"
ufw allow in on "${VLAN_IF}" from "${VLAN_CIDR}" to "${VLAN_MARIADB_IP}" port "${VLAN_MARIADB_PORT}" proto tcp comment "Open TCP MariaDB PORT on ${VLAN_MARIADB_DESC} host for cluster"
ufw allow in on "${VLAN_IF}" from "${VLAN_CIDR}" to "${VLAN_MARIADB_IP}" port "${VLAN_GALERA_PORT_1}" proto tcp comment "Open TCP Galera Replication PORT on ${VLAN_MARIADB_DESC} host for cluster"
ufw allow in on "${VLAN_IF}" from "${VLAN_CIDR}" to "${VLAN_MARIADB_IP}" port "${VLAN_GALERA_PORT_1}" proto udp comment "Open UDP Galera Replication PORT on ${VLAN_MARIADB_DESC} host for cluster"
ufw allow in on "${VLAN_IF}" from "${VLAN_CIDR}" to "${VLAN_MARIADB_IP}" port "${VLAN_GALERA_PORT_2}" proto tcp comment "Open TCP Galera Incremental State Transfer PORT on ${VLAN_MARIADB_DESC} host for cluster"
ufw allow in on "${VLAN_IF}" from "${VLAN_CIDR}" to "${VLAN_MARIADB_IP}" port "${VLAN_GALERA_PORT_3}" proto tcp comment "Open TCP Galera State Snapshot Transfer PORT on ${VLAN_MARIADB_DESC} host for cluster"
mysql3 host firewall
# adjust the following as per your set up #
VLAN_MARIADB_IP="172.0.0.3"
VLAN_MARIADB_DESC="mysql3"
VLAN_IF="eth1"
VLAN_CIDR="172.0.0.0/24"
VLAN_MARIADB_PORT="3306"
VLAN_GALERA_PORT_1="4567"
VLAN_GALERA_PORT_2="4568"
VLAN_GALERA_PORT_3="4444"
ufw allow in on "${VLAN_IF}" from "${VLAN_CIDR}" to "${VLAN_MARIADB_IP}" port "${VLAN_MARIADB_PORT}" proto tcp comment "Open TCP MariaDB PORT on ${VLAN_MARIADB_DESC} host for cluster"
ufw allow in on "${VLAN_IF}" from "${VLAN_CIDR}" to "${VLAN_MARIADB_IP}" port "${VLAN_GALERA_PORT_1}" proto tcp comment "Open TCP Galera Replication PORT on ${VLAN_MARIADB_DESC} host for cluster"
ufw allow in on "${VLAN_IF}" from "${VLAN_CIDR}" to "${VLAN_MARIADB_IP}" port "${VLAN_GALERA_PORT_1}" proto udp comment "Open UDP Galera Replication PORT on ${VLAN_MARIADB_DESC} host for cluster"
ufw allow in on "${VLAN_IF}" from "${VLAN_CIDR}" to "${VLAN_MARIADB_IP}" port "${VLAN_GALERA_PORT_2}" proto tcp comment "Open TCP Galera Incremental State Transfer PORT on ${VLAN_MARIADB_DESC} host for cluster"
ufw allow in on "${VLAN_IF}" from "${VLAN_CIDR}" to "${VLAN_MARIADB_IP}" port "${VLAN_GALERA_PORT_3}" proto tcp comment "Open TCP Galera State Snapshot Transfer PORT on ${VLAN_MARIADB_DESC} host for cluster"
Verify firewall rules
Use the ufw command as follows on each cluster node or host:
ufw show added

ufw status
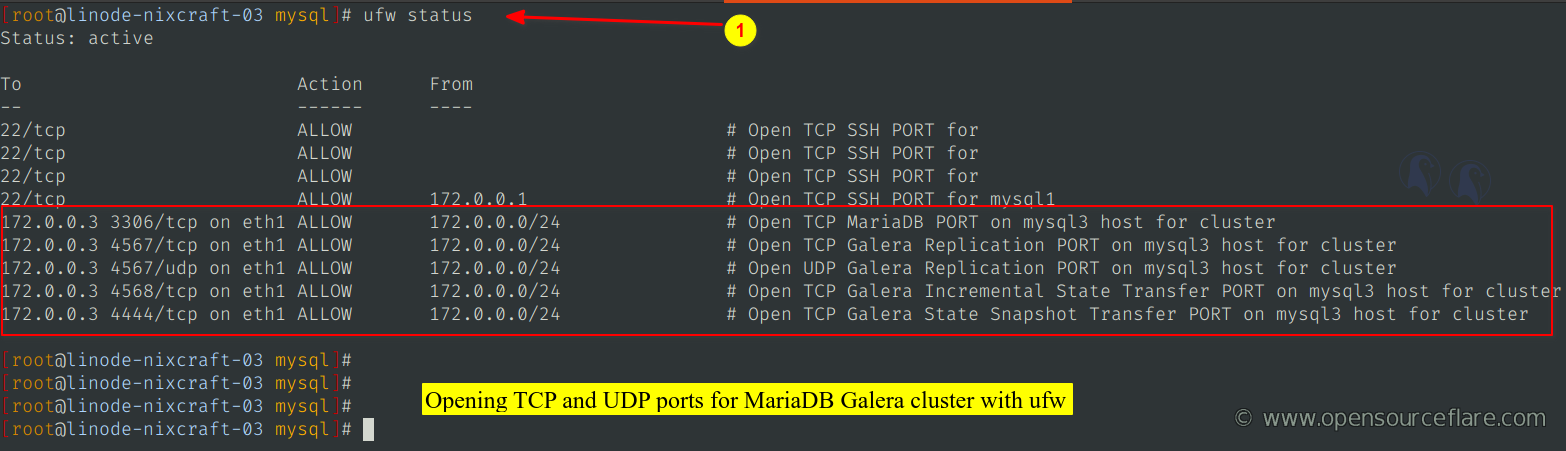
When configuring a firewall for a VLAN/VPC environment, there are four ports that you need to open to TCP for Galera Cluster and one to UDP transport to enable multicast replication (click to enlarge)
Setting up replication using Galera library
First, stop the MariaDB service on all nodes so that we can bootstrap clusters and join clusters node one-by-one, run:
# Typing on the 'mysql1' host  #

systemctl stop mariadb.service #<-- mysql1

ssh mysql2 "systemctl stop mariadb.service" #<-- stop mysql2 service

ssh mysql3 "systemctl stop mariadb.service" #<-- stop mysql3 service
Warning: The config options are the same for all Galera cluster nodes except for the IP address and hostname. So make sure you add the correct VLAN/VPC ip address and hostname as per your setup. Do not listen to a public IPv4/IPv6 address. Apart from TLS, restricting traffic to VLAN/VPC cut many security risks from the Internet. I have added comments to the config file for ease of understanding.
mysql1 host config
Then edit the /etc/mysql/mariadb.conf.d/60-galera.cnf on mysql1 host:
vim /etc/mysql/mariadb.conf.d/60-galera.cnf
Edit/update as follows under the [galera] section:
# Mandatory settings
# set up mysql1, mysql2 and mysql3 address wsrep_cluster_address
wsrep_on                 = ON
wsrep_provider		 = /usr/lib/galera/libgalera_smm.so
wsrep_cluster_name       = "MariaDB Galera Cluster"
wsrep_cluster_address    = "gcomm://172.0.0.1,172.0.0.2,172.0.0.3"
binlog_format            = row
default_storage_engine   = InnoDB
innodb_autoinc_lock_mode = 2

#
# Optimzation for the cluster
# 1. Set up gcache.size for ring buffer storage size (the space the node uses for caching write sets), preallocated on startup. (default 128M)
# 2. Force gcache.recover. Whether or not gcache recovery takes place when the node starts up. If it is possible to recover gcache, the node can then provide IST to other joining nodes, which assists when the whole cluster is restarted. (default NO)
# 3. Size of the page storage page files. These are prefixed by gcache.page. Can be set to as large as the disk can handle. (default 128M)
# 4. socket.ssl_* - Explicitly enables TLS usage by the wsrep Provider. (defaults are NO)
#
wsrep_provider_options="gcache.size=1G;gcache.page_size=1G;gcache.recover=yes;socket.ssl_key=/etc/mysql/ssl/server-key.pem;socket.ssl_cert=/etc/mysql/ssl/server-cert.pem;socket.ssl_ca=/etc/mysql/ssl/ca-cert.pem"


# Allow server to accept connections on vlan interface with 172.0.0.1 IP address
bind-address = 172.0.0.1

# Galera Synchronization Configuration
wsrep_sst_method=mariabackup
wsrep_sst_auth=mysql:


# Galera mysql1 node configuration (IP, hostname, and port for this node)
wsrep_node_address="172.0.0.1"
wsrep_node_name="mysql1"
wsrep_provider_options="gmcast.listen_addr=tcp://172.0.0.1:4567"

# Set up TLS certficates for SST
[sst]
encrypt=4
tkey=/etc/mysql/ssl/server-key.pem
tcert=/etc/mysql/ssl/server-cert.pem
tca=/etc/mysql/ssl/ca-cert.pem
mysql2 host config
Then edit the /etc/mysql/mariadb.conf.d/60-galera.cnf on mysql2 host:
vim /etc/mysql/mariadb.conf.d/60-galera.cnf
Edit/update as follows under the [galera] section:
# Mandatory settings
# set up mysql1, mysql2 and mysql3 address wsrep_cluster_address
wsrep_on                 = ON
wsrep_provider		 = /usr/lib/galera/libgalera_smm.so
wsrep_cluster_name       = "MariaDB Galera Cluster"
wsrep_cluster_address    = "gcomm://172.0.0.1,172.0.0.2,172.0.0.3"
binlog_format            = row
default_storage_engine   = InnoDB
innodb_autoinc_lock_mode = 2

#
# Optimzation for the cluster
# 1. Set up gcache.size for ring buffer storage size (the space the node uses for caching write sets), preallocated on startup. (default 128M)
# 2. Force gcache.recover. Whether or not gcache recovery takes place when the node starts up. If it is possible to recover gcache, the node can then provide IST to other joining nodes, which assists when the whole cluster is restarted. (default NO)
# 3. Size of the page storage page files. These are prefixed by gcache.page. Can be set to as large as the disk can handle. (default 128M)
# 4. socket.ssl_* - Explicitly enables TLS usage by the wsrep Provider. (defaults are NO)
#
wsrep_provider_options="gcache.size=1G;gcache.page_size=1G;gcache.recover=yes;socket.ssl_key=/etc/mysql/ssl/server-key.pem;socket.ssl_cert=/etc/mysql/ssl/server-cert.pem;socket.ssl_ca=/etc/mysql/ssl/ca-cert.pem"


# Allow server to accept connections on vlan interface with 172.0.0.2 IP address
bind-address = 172.0.0.2

# Galera Synchronization Configuration
wsrep_sst_method=mariabackup
wsrep_sst_auth=mysql:


# Galera mysql1 node configuration (IP, hostname, and port for mysql2 node)
wsrep_node_address="172.0.0.2"
wsrep_node_name="mysql2"
wsrep_provider_options="gmcast.listen_addr=tcp://172.0.0.2:4567"

# Set up TLS certficates for replication traffic too
[sst]
encrypt=4
tkey=/etc/mysql/ssl/server-key.pem
tcert=/etc/mysql/ssl/server-cert.pem
tca=/etc/mysql/ssl/ca-cert.pem
mysql3 host config
Then edit the /etc/mysql/mariadb.conf.d/60-galera.cnf on mysql3 host:
vim /etc/mysql/mariadb.conf.d/60-galera.cnf
Edit/update as follows under the [galera] section:
# Mandatory settings
# set up mysql1, mysql2 and mysql3 address wsrep_cluster_address
wsrep_on                 = ON
wsrep_provider		 = /usr/lib/galera/libgalera_smm.so
wsrep_cluster_name       = "MariaDB Galera Cluster"
wsrep_cluster_address    = "gcomm://172.0.0.1,172.0.0.2,172.0.0.3"
binlog_format            = row
default_storage_engine   = InnoDB
innodb_autoinc_lock_mode = 2

#
# Optimzation for the cluster
# 1. Set up gcache.size for ring buffer storage size (the space the node uses for caching write sets), preallocated on startup. (default 128M)
# 2. Force gcache.recover. Whether or not gcache recovery takes place when the node starts up. If it is possible to recover gcache, the node can then provide IST to other joining nodes, which assists when the whole cluster is restarted. (default NO)
# 3. Size of the page storage page files. These are prefixed by gcache.page. Can be set to as large as the disk can handle. (default 128M)
# 4. socket.ssl_* - Explicitly enables TLS usage by the wsrep Provider. (defaults are NO)
#
wsrep_provider_options="gcache.size=1G;gcache.page_size=1G;gcache.recover=yes;socket.ssl_key=/etc/mysql/ssl/server-key.pem;socket.ssl_cert=/etc/mysql/ssl/server-cert.pem;socket.ssl_ca=/etc/mysql/ssl/ca-cert.pem"


# Allow server to accept connections on vlan interface with 172.0.0.3 IP address
bind-address = 172.0.0.3

# Galera Synchronization Configuration
wsrep_sst_method=mariabackup
wsrep_sst_auth=mysql:


# Galera mysql1 node configuration (IP, hostname, and port for mysql3 node)
wsrep_node_address="172.0.0.3"
wsrep_node_name="mysql3"
wsrep_provider_options="gmcast.listen_addr=tcp://172.0.0.3:4567"

# Set up TLS certficates for replication traffic too
[sst]
encrypt=4
tkey=/etc/mysql/ssl/server-key.pem
tcert=/etc/mysql/ssl/server-cert.pem
tca=/etc/mysql/ssl/ca-cert.pem
Bootstrapping a new cluster
Everything is configured and ready now. Type the following command on the mysql1 host to create a new cluster. This concept is known as bootstrapping:
Please do not type the following command when connecting to an existing cluster or other members of our cluster, such as mysql2 and mysql3 host. You must use the following command once on mysql1 host. Make sure all cluster nodes are stopped before you type the following command.
galera_new_cluster

# verify it #

systemctl status mariadb.service
Sample outputs (look for --wsrep-new-cluster and --wsrep_start_position):
● mariadb.service - MariaDB 10.6.4 database server
     Loaded: loaded (/lib/systemd/system/mariadb.service; enabled; vendor preset: enabled)
    Drop-In: /etc/systemd/system/mariadb.service.d
             └─migrated-from-my.cnf-settings.conf
     Active: active (running) since Sat 2021-08-28 08:15:19 UTC; 13s ago
       Docs: man:mariadbd(8)
             https://mariadb.com/kb/en/library/systemd/
    Process: 7531 ExecStartPre=/usr/bin/install -m 755 -o mysql -g root -d /var/run/mysqld (code=exited, status=0/SUCCESS)
    Process: 7544 ExecStartPre=/bin/sh -c systemctl unset-environment _WSREP_START_POSITION (code=exited, status=0/SUCCESS)
    Process: 7552 ExecStartPre=/bin/sh -c [ ! -e /usr/bin/galera_recovery ] && VAR= ||   VAR=`cd /usr/bin/..; /usr/bin/galera_recovery`; [ $? -eq 0 ]   && systemctl set-environment _WSREP_START_POSITION=$VAR || exit 1 (code=exited>
    Process: 7696 ExecStartPost=/bin/sh -c systemctl unset-environment _WSREP_START_POSITION (code=exited, status=0/SUCCESS)
    Process: 7698 ExecStartPost=/etc/mysql/debian-start (code=exited, status=0/SUCCESS)
   Main PID: 7678 (mariadbd)
     Status: "Taking your SQL requests now..."
      Tasks: 19 (limit: 4617)
     Memory: 87.5M
     CGroup: /system.slice/mariadb.service
             └─7678 /usr/sbin/mariadbd --wsrep-new-cluster --wsrep_start_position=00000000-0000-0000-0000-000000000000:-1

Aug 28 08:15:19 linode-nixcraft-01 mariadbd[7678]: 2021-08-28  8:15:19 1 [Note] WSREP: Server status change joined -> synced
Aug 28 08:15:19 linode-nixcraft-01 mariadbd[7678]: 2021-08-28  8:15:19 1 [Note] WSREP: Synchronized with group, ready for connections
Aug 28 08:15:19 linode-nixcraft-01 mariadbd[7678]: 2021-08-28  8:15:19 1 [Note] WSREP: wsrep_notify_cmd is not defined, skipping notification.
Aug 28 08:15:19 linode-nixcraft-01 /etc/mysql/debian-start[7700]: Upgrading MySQL tables if necessary.
Aug 28 08:15:19 linode-nixcraft-01 systemd[1]: Started MariaDB 10.6.4 database server.
Aug 28 08:15:19 linode-nixcraft-01 /etc/mysql/debian-start[7703]: Looking for 'mysql' as: /usr/bin/mysql
Aug 28 08:15:19 linode-nixcraft-01 /etc/mysql/debian-start[7703]: Looking for 'mysqlcheck' as: /usr/bin/mysqlcheck
Aug 28 08:15:19 linode-nixcraft-01 /etc/mysql/debian-start[7703]: This installation of MariaDB is already upgraded to 10.6.4-MariaDB, use --force if you still need to run mysql_upgrade
Aug 28 08:15:19 linode-nixcraft-01 /etc/mysql/debian-start[7712]: Checking for insecure root accounts.
Aug 28 08:15:19 linode-nixcraft-01 /etc/mysql/debian-start[7716]: Triggering myisam-recover for all MyISAM tables and aria-recover for all Aria tables
Joining other nodes (mysql1 and mysql2) to a cluster
Now, the first mysql1 node is up and running. How do you join this cluster? Start service on remaining nodes one by one. In other words, start MariaDB service on the mysql2 and mysql3 hosts as follows:
systemctl start mariadb.service #<-- type on the mysql2  host

systemctl start mariadb.service #<-- type on the mysql3  host
Check the server status too:
systemctl status mariadb.service #<-- type on the mysql2  host

systemctl status mariadb.service #<-- type on the mysql3  host
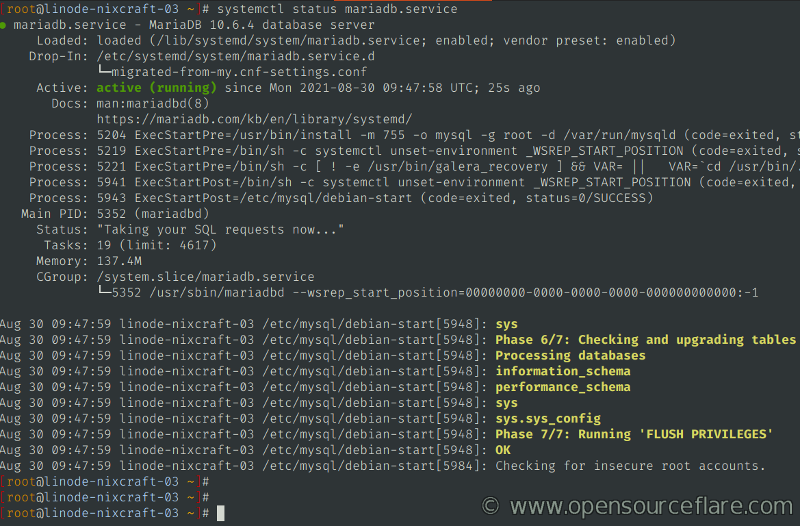
Cluster verification
Type command on the mysql1 host:
mysql -e "SHOW STATUS LIKE 'wsrep_cluster_size';"
mysql -e "SHOW VARIABLES LIKE 'wsrep%'\G;" | more
mysql -e "SHOW VARIABLES LIKE 'wsrep%';" | grep -E -w 'wsrep_provider|wsrep_cluster_address|wsrep_cluster_name|wsrep_node_address|wsrep_node_name|wsrep_on'
The following output indicating that a 3 node cluster is up and running:
wsrep_cluster_address	gcomm://172.0.0.1,172.0.0.2,172.0.0.3
wsrep_cluster_name	MariaDB Galera Cluster
wsrep_node_address	172.0.0.1
wsrep_node_name	mysql1
wsrep_on	ON
wsrep_provider	/usr/lib/galera/libgalera_smm.so
You can type the following SQL once logged in using the mysql client:
SHOW STATUS like 'wsrep%';
Sample outputs:
+-------------------------------+------------------------------------------------------------------------------------------------------------------------------------------------+ | Variable_name | Value | +-------------------------------+------------------------------------------------------------------------------------------------------------------------------------------------+ | wsrep_local_state_uuid | 0df4d0a6-0977-11ec-acb5-0fe3b3aabf4b | | wsrep_protocol_version | 10 | | wsrep_last_committed | 20 | | wsrep_replicated | 17 | | wsrep_replicated_bytes | 6848 | | wsrep_repl_keys | 39 | | wsrep_repl_keys_bytes | 720 | | wsrep_repl_data_bytes | 4969 | | wsrep_repl_other_bytes | 0 | | wsrep_received | 10 | | wsrep_received_bytes | 836 | | wsrep_local_commits | 9 | | wsrep_local_cert_failures | 0 | | wsrep_local_replays | 0 | | wsrep_local_send_queue | 0 | | wsrep_local_send_queue_max | 1 | | wsrep_local_send_queue_min | 0 | | wsrep_local_send_queue_avg | 0 | | wsrep_local_recv_queue | 0 | | wsrep_local_recv_queue_max | 1 | | wsrep_local_recv_queue_min | 0 | | wsrep_local_recv_queue_avg | 0 | | wsrep_local_cached_downto | 1 | | wsrep_flow_control_paused_ns | 0 | | wsrep_flow_control_paused | 0 | | wsrep_flow_control_sent | 0 | | wsrep_flow_control_recv | 0 | | wsrep_flow_control_active | false | | wsrep_flow_control_requested | false | | wsrep_cert_deps_distance | 1.52941 | | wsrep_apply_oooe | 0 | | wsrep_apply_oool | 0 | | wsrep_apply_window | 1 | | wsrep_apply_waits | 0 | | wsrep_commit_oooe | 0 | | wsrep_commit_oool | 0 | | wsrep_commit_window | 1 | | wsrep_local_state | 4 | | wsrep_local_state_comment | Synced | | wsrep_cert_index_size | 10 | | wsrep_causal_reads | 0 | | wsrep_cert_interval | 0 | | wsrep_open_transactions | 0 | | wsrep_open_connections | 0 | | wsrep_incoming_addresses | AUTO,AUTO,AUTO | | wsrep_cluster_weight | 3 | | wsrep_desync_count | 0 | | wsrep_evs_delayed | | | wsrep_evs_evict_list | | | wsrep_evs_repl_latency | 0/0/0/0/0 | | wsrep_evs_state | OPERATIONAL | | wsrep_gcomm_uuid | 0df46621-0977-11ec-9ef7-3a542f7cf18b | | wsrep_gmcast_segment | 0 | | wsrep_applier_thread_count | 1 | | wsrep_cluster_capabilities | | | wsrep_cluster_conf_id | 3 | | wsrep_cluster_size | 3 | | wsrep_cluster_state_uuid | 0df4d0a6-0977-11ec-acb5-0fe3b3aabf4b | | wsrep_cluster_status | Primary | | wsrep_connected | ON | | wsrep_local_bf_aborts | 0 | | wsrep_local_index | 0 | | wsrep_provider_capabilities | :MULTI_MASTER:CERTIFICATION:PARALLEL_APPLYING:TRX_REPLAY:ISOLATION:PAUSE:CAUSAL_READS:INCREMENTAL_WRITESET:UNORDERED:PREORDERED:STREAMING:NBO: | | wsrep_provider_name | Galera | | wsrep_provider_vendor | Codership Oy <[email protected]> | | wsrep_provider_version | 26.4.9(r819f29cb) | | wsrep_ready | ON | | wsrep_rollbacker_thread_count | 1 | | wsrep_thread_count | 2 | +-------------------------------+------------------------------------------------------------------------------------------------------------------------------------------------+ 69 rows in set (0.001 sec)
Do check Galera Cluster Status Variables for variable explanation here and here.
How do I test DB replication?
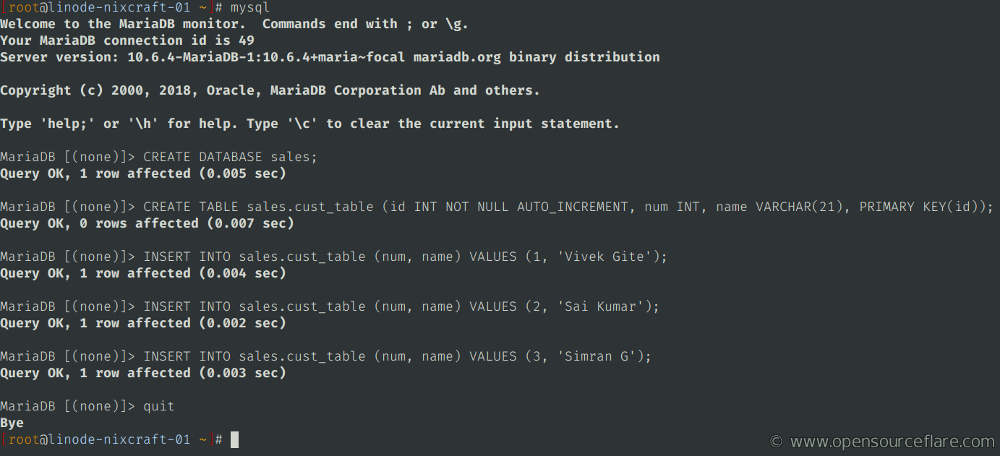
On the mysql1 host, create a new database called foo and insert some values into a new table:
mysql
Then at the MariaDB [(none)]> prompt type:
CREATE DATABASE sales;
CREATE TABLE sales.cust_table (id INT NOT NULL AUTO_INCREMENT, num INT, name VARCHAR(21), PRIMARY KEY(id));
INSERT INTO sales.cust_table (num, name) VALUES (1, 'Vivek Gite');
INSERT INTO sales.cust_table (num, name) VALUES (2, 'Sai Kumar');
INSERT INTO sales.cust_table (num, name) VALUES (3, 'Simran G');
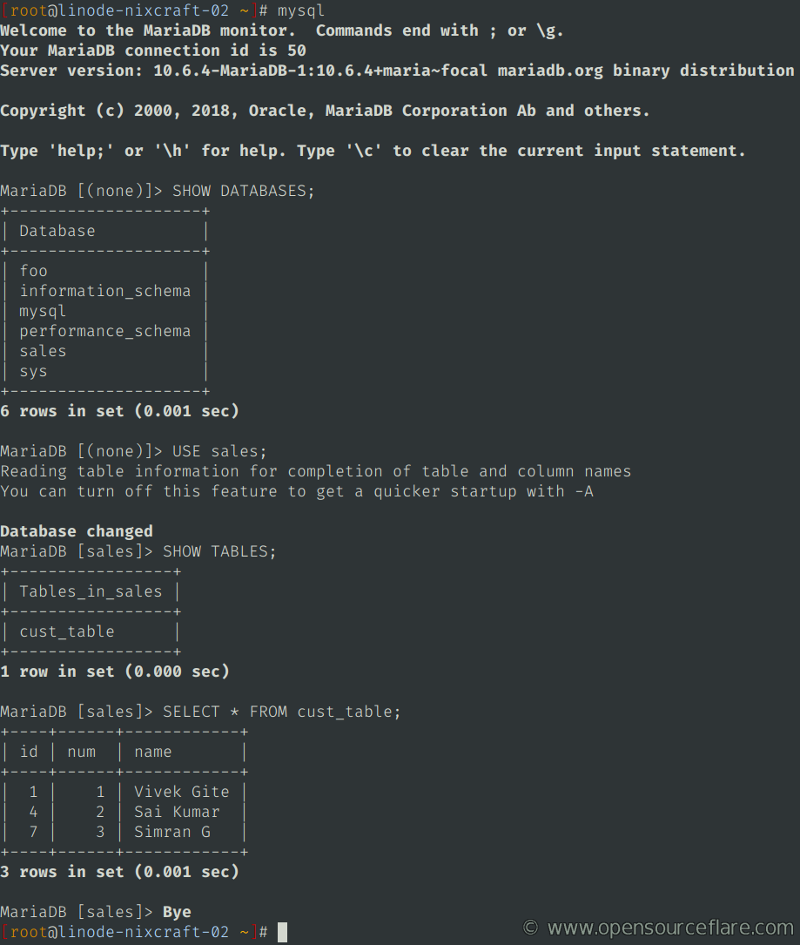
Next log in to the mysql2 or mysql2:
ssh mysql2

mysql
Run the following SQL statements and you should see the same output from the three nodes, confirming that the databases are synchronized and cluster is working:
SHOW DATABASES;
USE sales;
SHOW TABLES;
SELECT * FROM cust_table;
A note about the client
So our cluster is up and running? It is time to update your application written in Python, Perl, or PHP to point to the cluster IP address. They can write to any node, and change will get replicated. However, traffic will not automatically load balanced. Hence, you need to use ProxySQL (recommend) or HAProxy for such a task.
Summing up
That is all for now. I explained so far:
- How to install the latest version of MariaDB 10.6 and Galera 4.
- For security reasons, we blocked our cluster access from the Internet using the ufw firewall.
- Traffic between nodes and mysql itself is replicated using TLS.
- Tunning our cluster and more.
However, specific DBA tasks will be cover in the next post as this guide itself getting lengthy. For example:
- How to add or remove a node from the cluster
- How to safely reboot the Linux for a kernel update
- How to backup and restore database and the cluster itself
- Rolling hardware and software updates
- Load balancing with ProxySQL
The knowledge you gained from this in-depth guide can be used further to automated cluster building using IT automation tools such as Ansible or Salt, which is left as an exercise for readers.