This guide explains how to build and deploy applications quickly with Podman to the cloud server of your choice. All examples in this tutorial are tested on Fedora Linux 34, but they should work on any Linux distros as long as you install the correct packages. I prefer to use Fedora when my clients use RHEL 7/8. Experimental podman packages are also available for Windows and macOS, but I have not tested those. Running containers without Docker is possible with Podman. This page is the first part of building containers with Podman, which explains installing Podman and working with images, including basic concepts of containers.
Contents
What is podman?
Podman is another tool like Docker that one can use to build and deploy Linux containers. However, the podman is daemonless. Therefore, containers managed by a podman can run as both root users or by a non-privileged user. Check this page for more information on Podman. This guide aims to provide you practical examples and get started with podman as quickly as possible.
How to install podman on Linux
In this tutorial, I will use Fedora 34, but podman works under other Linux distros such as Debian, Ubuntu, CentOS, Arch, Gentoo, and other Linux distros.
Package names from my Fedora 34 dev workstation:
- podman : Main package to manage pods, Linux containers and container images
- podman-compose : Run docker-compose.yml using podman
- podman-docker : Emulate Docker CLI using podman
- podman-plugins : This plugin sets up the use of dnsmasq on a given CNI network so that Pods can resolve each other by name such as nginx, mysql and so on.
Arch Linux
sudo pacman -S podman
CentOS 8 and Stream
sudo dnf -y install podman
Debian 11+ and Ubuntu Linux 20.10+
sudo apt update

sudo apt install podman
Fedora
Type the dnf command as follows to search and install podman packages:
sudo dnf update

sudo dnf search podman

sudo dnf install podman

Gentoo Linux
sudo emerge app-emulation/podman
openSUSE Linux
sudo zypper install podman
RHEL 7
sudo subscription-manager repos --enable=rhel-7-server-extras-rpms

sudo yum -y install podman
RHEL 8
sudo yum module enable -y container-tools:rhel8

sudo yum module install -y container-tools:rhel8
# Step 1. Create a new user account and password
sudo useradd -c "Vivek Gite" vivek
sudo passwd vivek

# Step 2. Verification
more /etc/sub{uid,gid}
podman unshare cat /proc/self/uid_map

# Step 3. Login using the 'ssh' and not using 'su -' as it will not set the correct environment variables
ssh vivek@fedora34-devbox

# Step 4. Now use the podman as usual as a non-root user
podman command
podman ps -a
podman search mariadb
There are some cases where you still need to use sudo (root access), such as integrating your containers with systemd to start them at boot time. For such cases, this tutorial use sudo. I strongly suggest that you read “shortcomings of rootless podman” too.
Verifying your installation
Let us display the podman version:
podman version
Version:      3.3.1
API Version:  3.3.1
Go Version:   go1.16.6
Built:        Mon Aug 30 16:46:36 2021
OS/Arch:      linux/amd64
The “Hello world” is a passage to all dev tools, and hence, we will run the hello-world image. Watch what happens closely:
podman run hello-world
Sample session:
Resolved "hello-world" as an alias (/etc/containers/registries.conf.d/000-shortnames.conf)
Trying to pull docker.io/library/hello-world:latest...
Getting image source signatures
Copying blob b8dfde127a29 done
Copying config d1165f2212 done
Writing manifest to image destination
Storing signatures

Hello from Docker!
This message shows that your installation appears to be working correctly.

To generate this message, Docker took the following steps:
 1. The Docker client contacted the Docker daemon.
 2. The Docker daemon pulled the "hello-world" image from the Docker Hub.
    (amd64)
 3. The Docker daemon created a new container from that image which runs the
    executable that produces the output you are currently reading.
 4. The Docker daemon streamed that output to the Docker client, which sent it
    to your terminal.

To try something more ambitious, you can run an Ubuntu container with:
 $ docker run -it ubuntu bash

Share images, automate workflows, and more with a free Docker ID:
 https://hub.docker.com/

For more examples and ideas, visit:
 https://docs.docker.com/get-started/
There is a path defined where the podman can look for Linux container images. This path is called a container registry. We can view those paths and registry Internet addresses using the following syntax:
more /etc/containers/registries.conf

ls -l ls -l /etc/containers/registries.d/
Since this is our fresh installation, the hello-world app image is not found local hard drive. Then podman went online and pulled the image for us. The run command runs a command in a new container. Hence, we see the outputs:
Hello from Docker!
This message shows that your installation appears to be working correctly.
The above message confirms that the podman is working as desired. Podman can use docker and other registries as defined /etc/containers/registries.conf file.
Getting started with Linux containers
So far, so good. Everything is up and running perfectly. Let us play with container images.
How to search images
Say you want to play with the latest version of the curl command. Back in the old days, you were restricted to whatever shipped with your distro’s package manager. But, with the container, we can download the curl image locally and run it without compiling or messing with our system. The curl app runs inside the pod (container) in an isolated and controlled execution environment. Hence, it won’t mess with your Linux dev workstation or production server. Enough talk. Let get our hands dirty. Search for the curl app image, run:
podman search {app_name}
podman search registry_name/{image_to_name}
podman search curl

# Limit search for the number of results (default is 25)
podman search --limit 5 php8

# Only search for docker.io registry curl image
podman search docker.io/curl

# List the available tags in the repository for the specified image
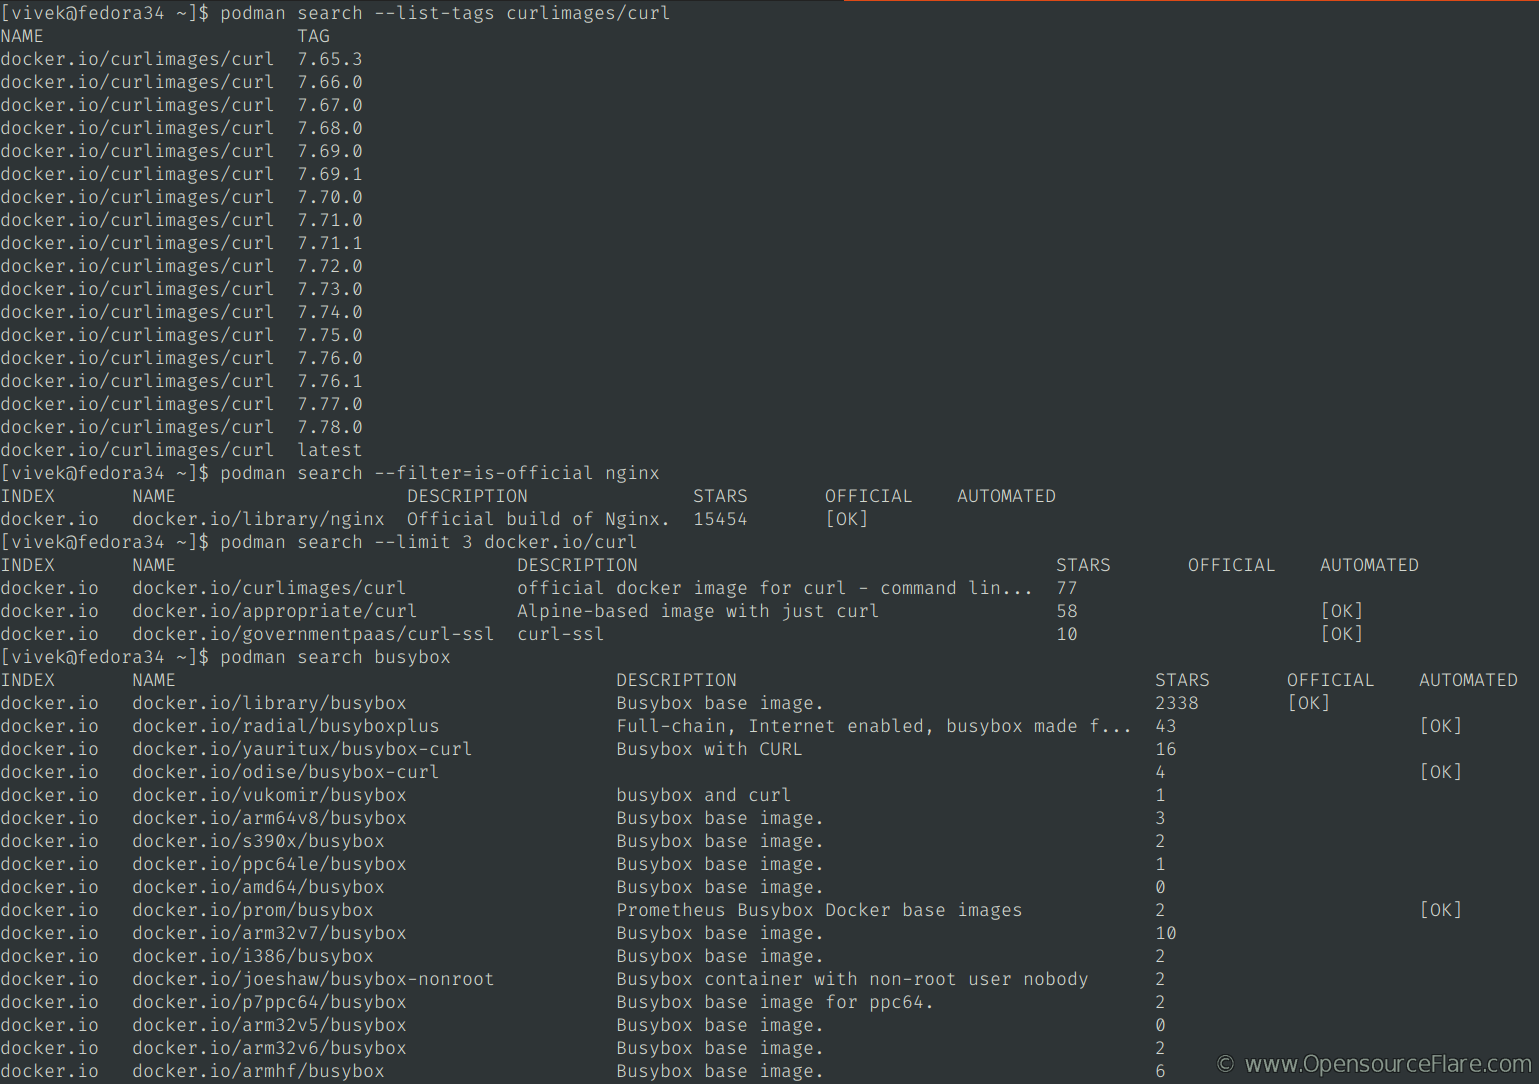
podman search --list-tags curlimages/curl

# Only search for the official nginx image
podman search --filter=is-official nginx
Click to enlarge
Download an image
Now you know how to search and find images with various criteria. It is time to download the official curl image using the pull command to download and save it on the local disk. You may be wondering, why pull an image? We pull the image to work on it and save time as our development progress:
podman pull {image-name}

# use tag such as latest or 7.4.23
podman pull {image-name}:{tag}

# get an image using its digest
podman pull {image-name}@{sha256:digest_goes_here}

# download an image with username:password by login into docker.io account
podman pull --creds {user_name}:{password} docker.io/foo/bar


# Pull Nginx web server image
podman pull nginx

# grab ubi7 mini image from registry.redhat.com
podman pull ubi7-minimal

# Grab mediawiki images using tags
podman pull mediawiki:lts
podman pull mediawiki:stable-fpm

# The syntax is:
podman pull {options} {image-name}

# Let us grab the latest curl image
podman pull curlimages/curl
podman pull curlimages/curl:latest
podman pull docker.io/curlimages/curl:latest
Outputs:
Trying to pull docker.io/curlimages/curl:latest...
Getting image source signatures
Copying blob bbd7ae250bec done
Copying blob 3c3a0bac4fd4 done
Copying blob 96f2f8a46766 done
Copying blob 71a6b1ccff48 done
Copying blob 5843afab3874 done
Copying blob 75880c76100d done
Copying blob 4223be0361b6 done
Copying blob ec6e56b62df2 done
Copying blob 110e7f874674 done
Copying config b920a0fc25 done
Writing manifest to image destination
Storing signatures
b920a0fc25efd75d3ee1073170d0c3eb84940cea6d5c2cdc7097facee7069f5b
Listing images
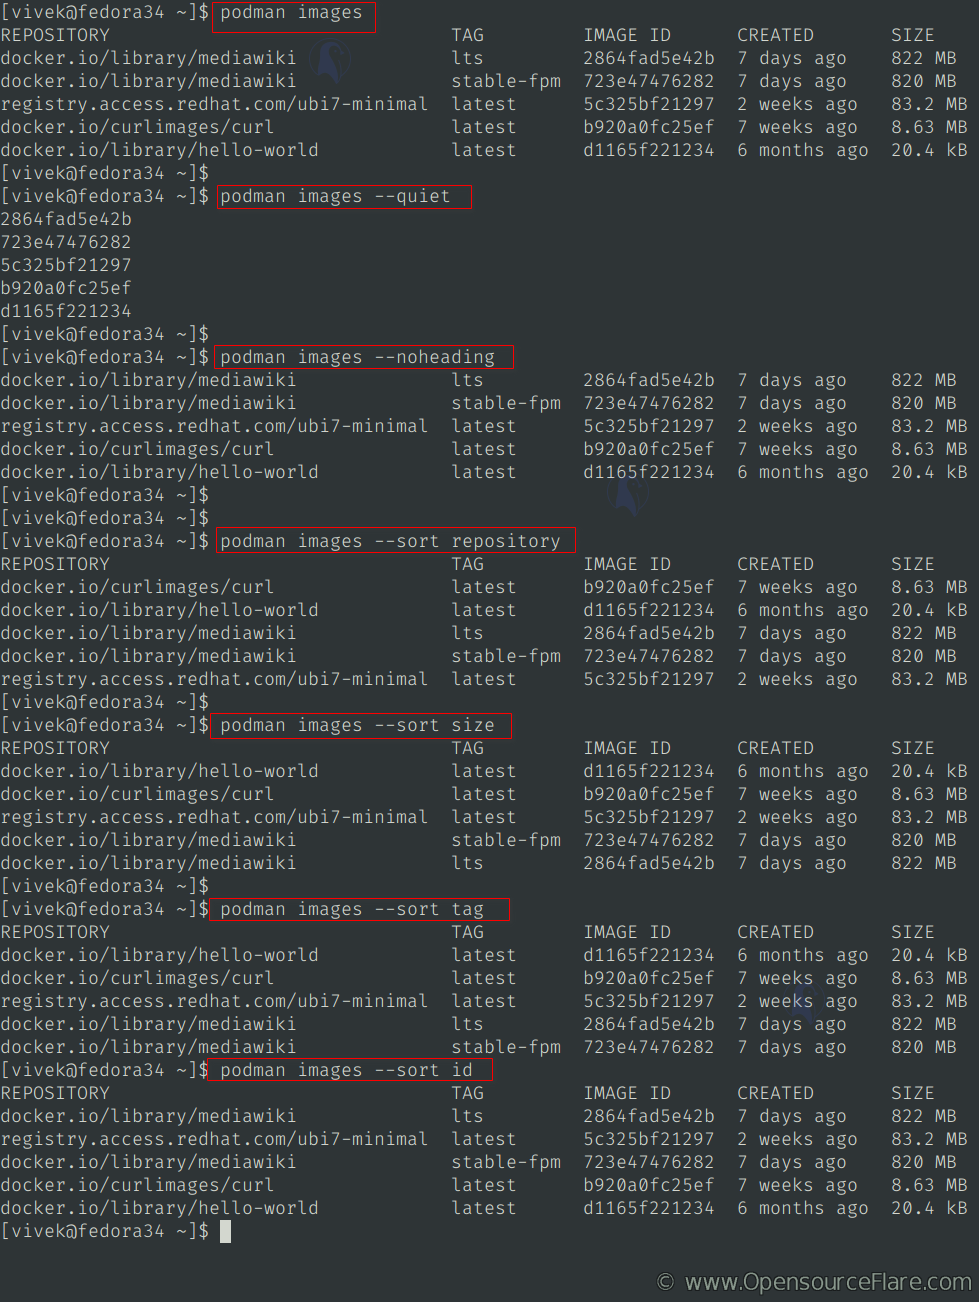
After downloading images, podman stores images on the local hard disk of your Linux dev workstation. Hence, we can list them with the images command:
podman images

# only show image IDs (useful for automation)
podman images --quiet

# want to hide headings? try
podman images --noheading

# we can sort by created, id, repository, size or tag (default: created)
podman images --sort repository
podman images --sort id
podman images --sort size
podman images --sort tag
Click to enlarge
Podman images have different types as follows:
- Base image : Typically os images don’t have any parents. For instance, Debian or Alpine Linux operating systems are called base images. From these images, we can build our custom image called a User-generated image or child image using a particular file called Dockerfile.
- Child image : As the name suggest, these type of images based upon the base image.
- Official image : Most open-source projects now have official images to avoid security issues or confusion among developers. These images are maintained by registry or vendors such as Docker.io or Redhat, and so on. These images are typically scanned and updated for security issues too. We use the podman search --filter=is-official {image_name} to search and list official image. For examples:
podman search --filter=is-official ubuntu
podman search --filter=is-official alpine
- User-generated image : These types of images created and shared by developers. You can find such images using username/image-name syntax.
Running curl pod (containers)
Remember we downloaded the curl image? Then, it is time to test the curl image using the podman run command to run a Linux container locally based on the downloaded image from the registry. The syntax is:
# Step 1. List local hdd image
podman images curl

# Step 2. Run it:
podman run curl

# Pass needed option to the curl command like you do it normally
podman run curl -s -I https://www.cyberciti.biz
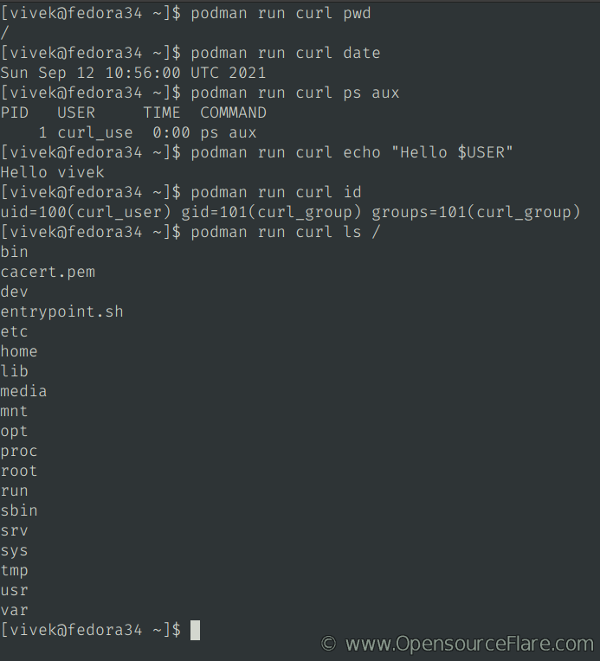
When you use podman run curl, the podman finds the curl image, loads up the container (boots container), and then runs a command in that container and exits to fedora 34 shell. So you can run basic Linux commands using the curl pod as follows apart from curl command:
podman run curl pwd
podman run curl date
podman run curl ps aux
podman run curl echo "Hello $USER"
podman run curl id
podman run curl ls /
Let us print the /entrypoint.sh file, try:
podman run curl cat /entrypoint.sh
Sample outputs:
#!/bin/sh
#
# Copyright (C) 2020 James Fuller <[email protected]>
#
# SPDX-License-Identifier: MIT
#

set -e

if [ "${1#-}" != "${1}" ] || [ -z "$(command -v "${1}")" ]; then
  set -- curl "$@"
fi

exec "$@"
The Linux container image defines a process that starts inside the container known as the entry point, and our curl image uses /entrypoint.sh as an entry point for pod or container. In other words, VM boots completely and goes in the background, loading everything for us. But, containers only boots and run the given process using the entry point. It is one of the fundamental differences between VM and podman (or docker, for that matter). We can display a container, image, volume, network, or pod’s configuration as follows:
podman inspect curl
podman inspect curl | more
We can put the container in the background as follows using the -d option (don’t worry about it right now, I will cover it below in details):
# based upon my own image
podman run -d --name myapp1 nixcraft/wordpressite

# Use nginx image and start a new container/pod named mywebsite in the background
# with a random port exposed
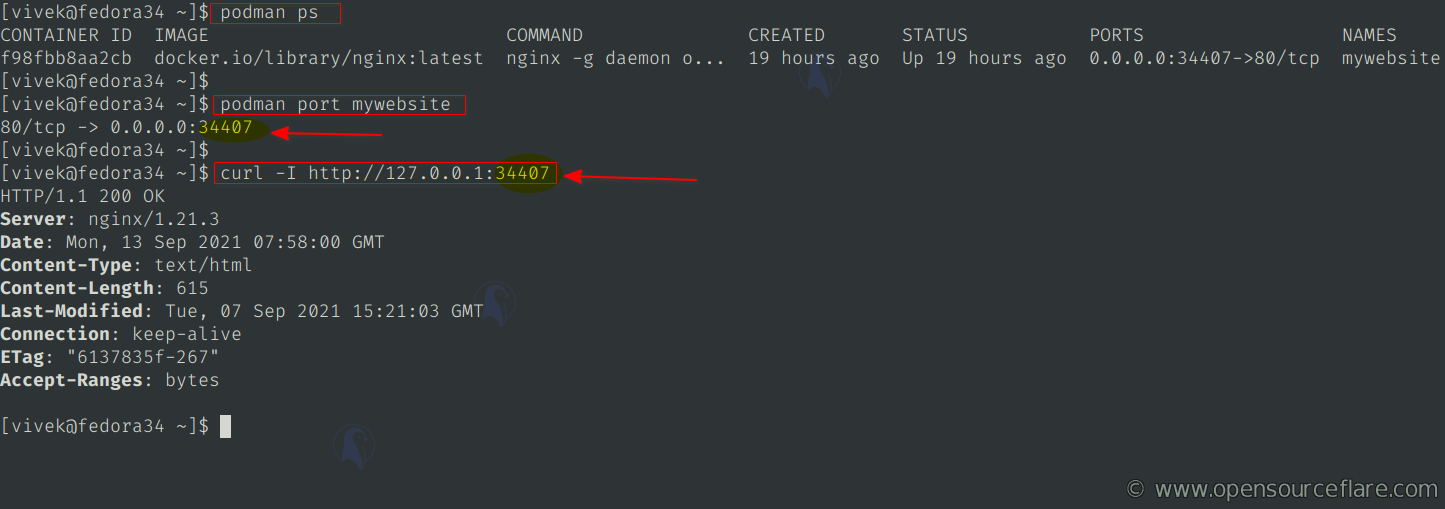
podman run -P -d --name mywebsite docker.io/library/nginx

# Verify it (can you mywebsite container and ports?)
podman ps
podman port mywebsite

# Send request to that random port
curl -I http://127.0.0.1:34407
Click to enlarge
Want to gain shell access to a container image named curl? Try:
podman images                    # get image list
podman run -it curl sh           # gain shell access to curl and run commands
podman run -it ubi7-minimal sh   # gain shell access to ubi7-minimal and run commands
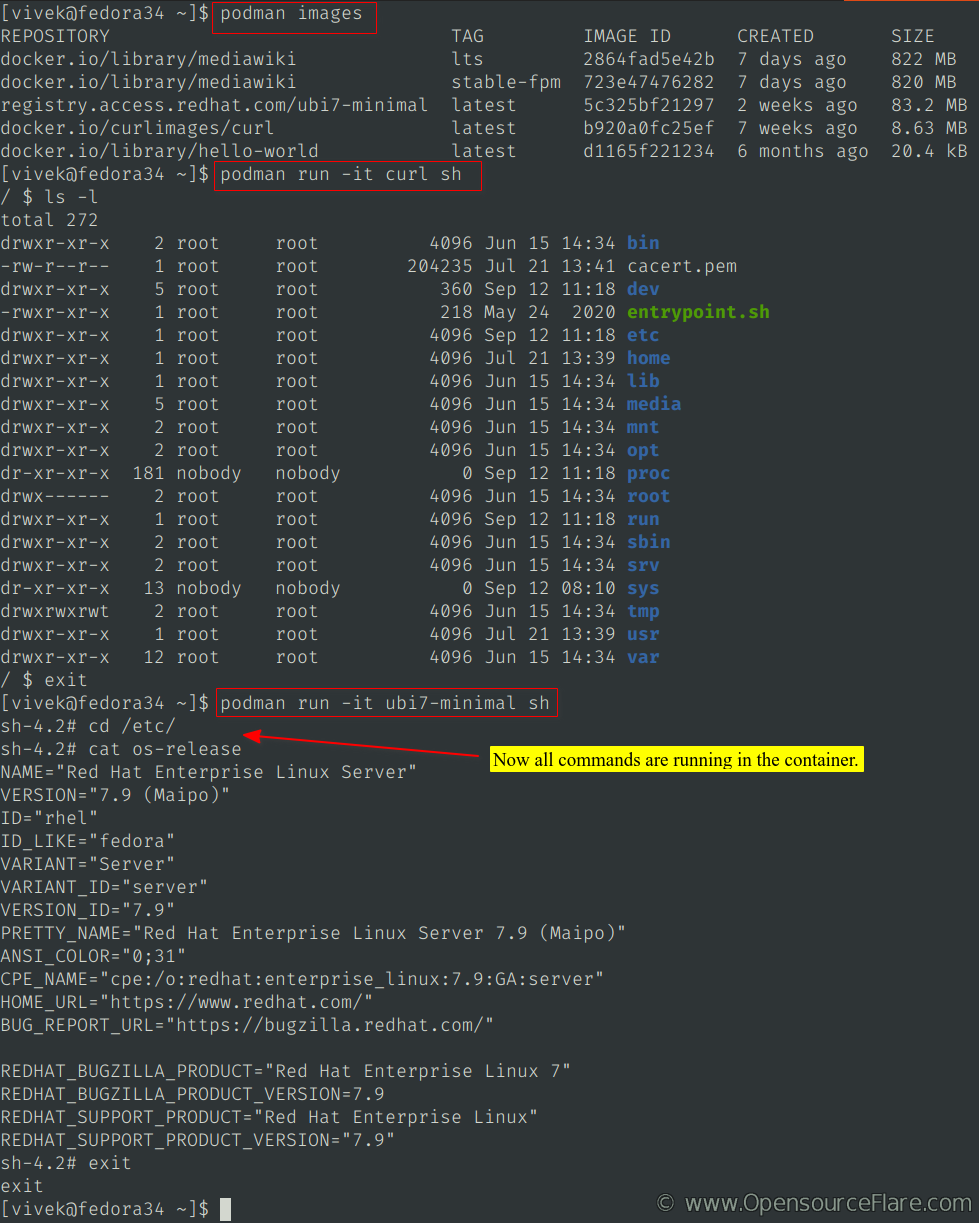
Running the podman run {image_name} -it sh command gives us to an interactive shell access in the container. Only use this for debugging purposes. Remember, Linux containers are not like normal servers or VM.
- -t or --tty : Allocate a pseudo-TTY (pseudo-terminal)
- -i or --interactive : Stdin (standard input) is kept open into the container.
- -d or --detach : Run the container in background. This is what you need for the production.
- --name myapp1 : Assign a name called “myapp1” to the container.
- -P : Publish all exposed ports to random ports on the host interfaces.
Prints out information about pods or containers
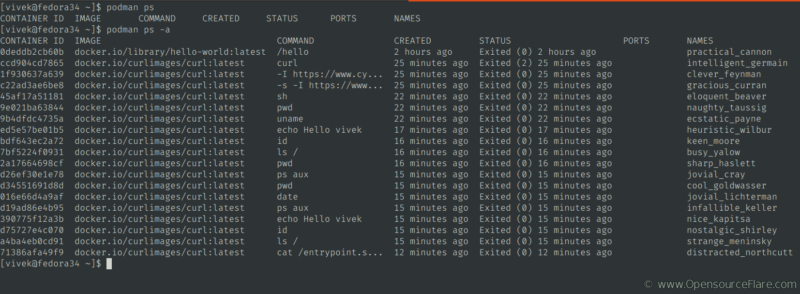
By default, all Podman containers and images run in the foreground. In other words, boots container, run command, and then exit. We can verify running pods or containers using the ps command:
podman ps
Outputs:
CONTAINER ID IMAGE COMMAND CREATED STATUS PORTS NAMES
Nothing is displayed as containers are not running right now. But pass the -a to see all the containers created by Podman:
podman ps -a
Click to enlarge
Deleting container/pod
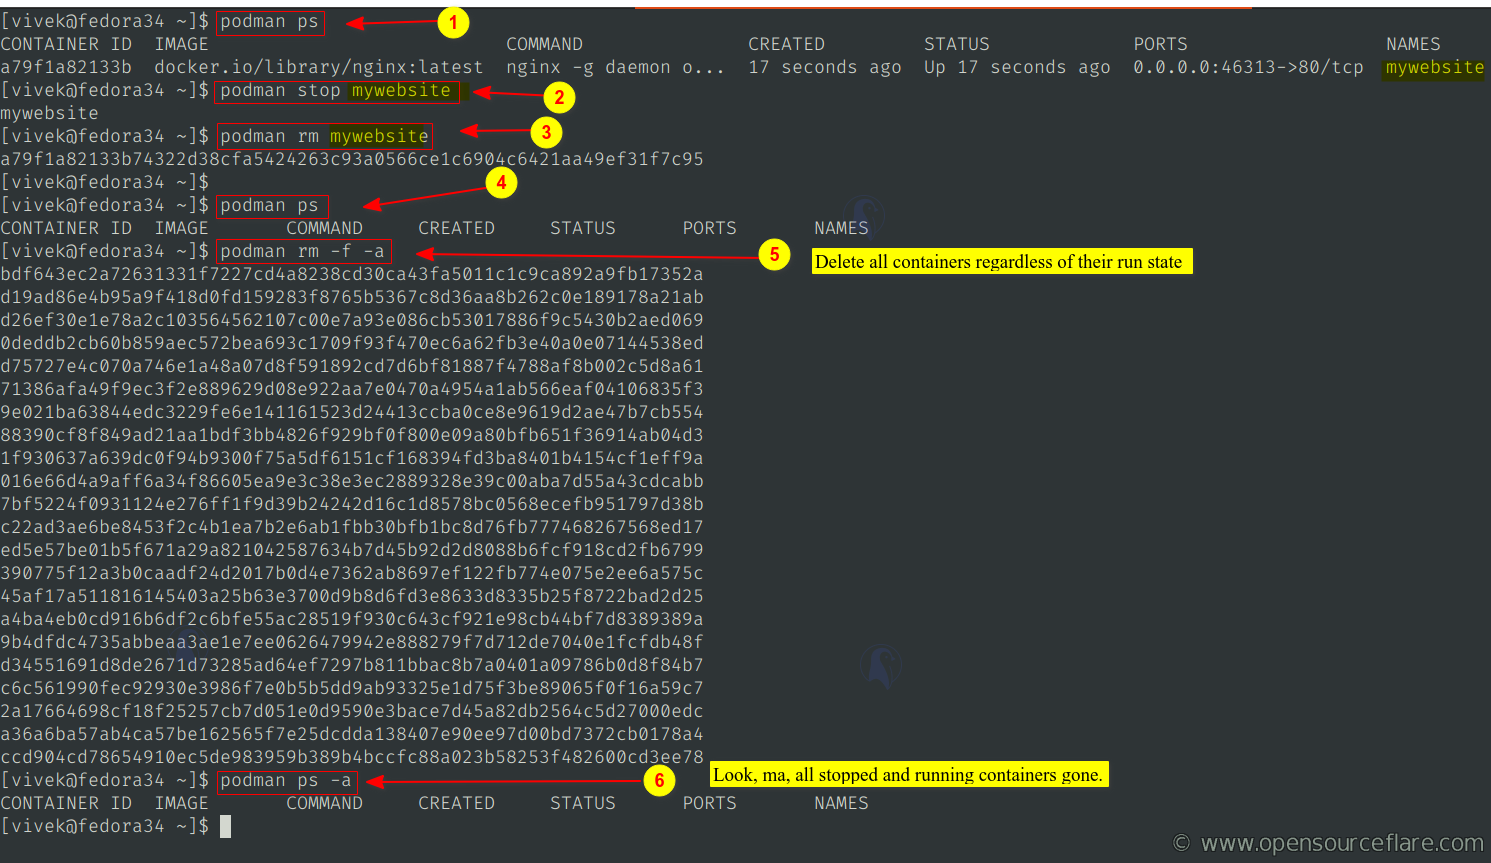
We need to use the podman rm {continaier_name} to remove containers from the host. Please note that running or unusable Linux containers will not be removed without the -f (–force) option. Try:
# Step #1: List running containers
podman ps

# Step #2: Stop a container by its name or ID obtained in step # 1
podman stop mywebsite

# Step #3:  Remove a container by its name or ID obtained in step # 1
podman rm mywebsite

# Step #4: Verify it
podman ps

# Forcibly remove a container by container ID or name
podman rm -f c22ad3ae6be8
podman rm --force nginxproxy


###########
# WARNING #
###########
#
# Delete all containers regardless of its run state using the '-a' and '-f' option
podman rm -f -a

#
# Forcibly remove the latest container created by sysadmin or user
#
podman rm -f --latest
Click to enlarge
NOTE: We can also remove all stopped containers from local storage using the following command:
podman container prune
Do not prompt for confirmation:
podman container prune -f
Deleting downloaded images
We started our tutorial by searching and downloading images. If you no longer need locally stored images, delete them using the podman rmi syntax:
# Step 1. List downloaded images
podman images

# Step 2. Delete nginx image by ID obtained by step #1
podman rmi ad4c705f24d3

# We can delete multiple images by their shortened IDs as follows too:
podman rmi id_1 id_2 id_3

# Want to remove an image and its associated containers? Try
podman rmi --force {ID_HERE}
podman rmi -f {IMAGE_ID_HERE}

# Remove all ('a') images and containers from local storage forcefully ('-f')
podman rmi -a -f
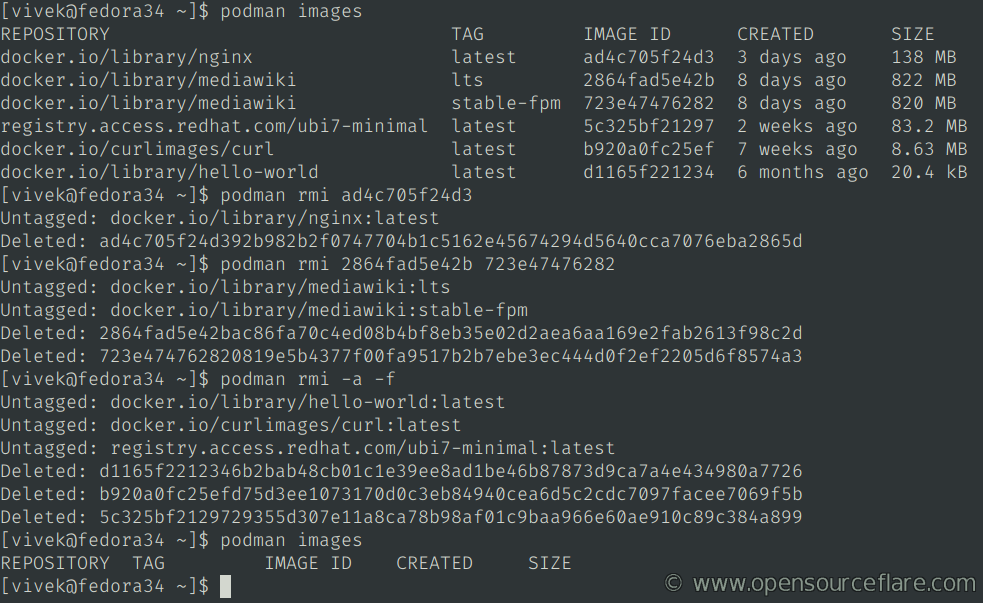
Removing downloaded images from local storage (click to enlarge)
Summary of essential podman and container terms:
So far, you have learned how to search for images stored in the registry, run containers, and delete containers and images from local storage. To avoid confusion, I avoided giving out podman and docker terms. However, now that you have hands-on experience, it is time to recap those terms:
- Podman images : We used the podman pull command to grab images to build our application. It is the most important thing in containers. Without those images, we will not be able to develop and extend custom containers.
- Registry (Docker HUB or Fedora/Redhat Hub) : A central place (think of it as a directory) on the Internet lists all podman or docker images. Podman supports multiple registries. But, we can set up our registry too. These are defined in /etc/containers/registries.conf file.
- Containers or Pods : Containers or Pods are always created from images downloaded from the registry. Containers contain our actual app. As explained earlier, you need to run the podman run command to create a new container in the foreground or background. This command also maps TCP ports and sets up firewall rules for us. Then we can use the podman ps command to list, and podman stop command to stop containers. Finally, the podman rm used to delete containers and data.
- podman client : podman is called “Pod Manager,” a fully featured container engine that is a simple daemonless tool. The podman command provides a Docker-CLI comparable command line that eases the transition from other container engines and allows the management of pods, containers, and images on your development workstation or production Linux servers.
- Pod : – It means a single Linux container. Each pod is a complete application. Each pod will contain your application code, libraries, dependencies, and system tools needed to run your app.
- Pods : – Groups of Linux containers, called pods. For example, an app written in Python or PHP will have two pods. One for Python/PHP with Nginx and another one for MySQL/PgSQL database. Pods are the foundation of microservices. Each service (process) will run in its pod.
- Container Orchestration – It is a tool that manages Linux containers fleet on various nodes or servers. We use container orchestration tools to build, deploy, monitor, and manage containers on clustered systems across many servers. Kubernetes (k8s) is the most popular container orchestration tool. Other examples that you might know are Apache Mesos, Docker Swarm, OpenShift, and many other managed Kubernetes orchestration tools such as, Linode Kubernetes Engine (LKE), Google Kubernetes Engine (GKE) or Amazon Elastic Container Service for Kubernetes (EKS).
- OCI : Open Container Initiative (OCI) is a project started in June 2015 by Docker to design open standards for Linux containers.
- buildah : It is a command-line tool used for creating OCI images on Linux. You can build, push or sign container images.
- skopeo : It is another command-line tool for inspecting OCI images and repositories on registries. You can copy, review, delete and sign images.
- runc : The OCI Runtime Standard Reference implementation is runc that is used by buildah and skopeo.
- crun : Same as runc, but it is faster and has added advanced features for rootless containers.
- OpenShift : RedHat’s implementation of Kubernetes that you use for running many containers on multiple hosts/nodes.
Getting help about the podman
Getting help is easy. Use the man command:
man podman
man podman-{sub-command}
man podman-ps
man podman-run
podman --help
podman {sub-command} --help
podman ps --help
podman run --help
Do check Podman docs online here.
Summing up
This concludes the first part of the series. The next part of this series will explain how to build web apps with Podman using Dockerfile or Containerfile. Then we will look into pods and other topics.
I tried using podman the other week and had to give up because I couldn’t get my head around running it as not-root and I didn’t want to remake my entire workflow away from docker.
Did you encounter any issues with permissions etc when using local files inside containers or building images or did I miss something spectacularly when trying it out (obviously before I read your nicely written information)?
Not really. Once I read Shortcomings of Rootless Podman[1], it worked like a charm, and the majority of my problem went away.
[1] https://github.com/containers/podman/blob/main/rootless.md
Very informative for a newbie like me to docker very interesting
Total newbie with respect to docker containers, though I installed one on a local file server, but I would be interested to know what happens if I used your guide to install podman as well. Would it find the installed docker image and be able to manage it? Or would I have to remove it, install podman and then reinstall the docker image?
I have not tested both in the same machine or upgrades. It might cause a problem as those use different techniques.
Hi Vivek,
maybe it’s worth to change the hello world example to
otherwise after each run a stale container would be left.
Will do. thanks!