MySQL version 8.0 is a free and open-source database system used by most web applications and sites on the Internet. Typically MySQL is part of the LAMP (Linux, Apache, MySQL, Perl/Python/PHP) stack. MySQL heavily uses popular open-source software such as WordPress, MediaWiki, and others as a database storage engine. Let us see how to install MySQL server version 8.x on Ubuntu 22.04 LTS Linux server, including settings up a new database, users and fine tuning server config.
Contents
- 1 Step 1 – Update your system
- 2 Step 2 – Searching for MySQL 8 server package
- 3 Step 3 – Installing MySQL 8 server package
- 4 Step 4 – Securing MySQL 8 server
- 5 Step 5 – Enabling the MySQL server at boot time
- 6 Step 6 – Starting/Stopping/Restarting the MySQL server
- 7 Step 7 – Login into MySQL 8 server for testing purpose
- 8 Step 8 – Creating a new MySQL database and user/password
- 9 Step 9 – MySQL 8 server configurations
- 10 Summing up
Step 1 – Update your system
It is important that your patch your system by running the following apt command:
$ sudo apt update

[nixusersudo apt list --upgradable # get a list of upgrades

$ sudo apt upgrade

Updating system using the APT
Step 2 – Searching for MySQL 8 server package
Use the apt-cache command as follows
$ apt-cache search mysql-server
The system will return a list of available options, including Oracle MySQL 8.xx and MariaDB 10.x. For example:
mysql-server - MySQL database server (metapackage depending on the latest version)
mysql-server-8.0 - MySQL database server binaries and system database setup
mysql-server-core-8.0 - MySQL database server binaries
default-mysql-server - MySQL database server binaries and system database setup (metapackage)
default-mysql-server-core - MySQL database server binaries (metapackage)
mariadb-server-10.6 - MariaDB database server binaries
mariadb-server-core-10.6 - MariaDB database core server files
Want to find out more about MySQL server package named ‘mysql-server-8.0’? Try the apt command as follows:
$ apt info -a mysql-server-8.0
Package: mysql-server-8.0
Version: 8.0.29-0ubuntu0.22.04.2
Priority: optional
Section: database
Source: mysql-8.0
Origin: Ubuntu
Maintainer: Ubuntu Developers <[email protected]>
Original-Maintainer: Debian MySQL Maintainers <[email protected]>
Bugs: https://bugs.launchpad.net/ubuntu/+filebug
Installed-Size: 1610 kB
Provides: virtual-mysql-server
Pre-Depends: adduser (>= 3.40), debconf, mysql-common (>= 5.5)
Depends: lsb-base (>= 3.0-10), mysql-client-8.0 (>= 8.0.29-0ubuntu0.22.04.2), mysql-common (>= 5.8+1.0.4~), mysql-server-core-8.0 (= 8.0.29-0ubuntu0.22.04.2), passwd, perl:any (>= 5.6), psmisc, debconf (>= 0.5) | debconf-2.0
Recommends: libhtml-template-perl, mecab-ipadic-utf8
Suggests: mailx, tinyca
Conflicts: mariadb-server-10.1, mariadb-server-10.3, mysql-server-5.7, virtual-mysql-server
Homepage: http://dev.mysql.com/
Task: lamp-server
Download-Size: 1391 kB
APT-Sources: http://archive.ubuntu.com/ubuntu jammy-updates/main amd64 Packages
Description: MySQL database server binaries and system database setup
 MySQL is a fast, stable and true multi-user, multi-threaded SQL database
 server. SQL (Structured Query Language) is the most popular database query
 language in the world. The main goals of MySQL are speed, robustness and
 ease of use.
 .
 This package contains all the infrastructure needed to setup system
 databases.

Package: mysql-server-8.0
Version: 8.0.28-0ubuntu4
Priority: optional
Section: database
Source: mysql-8.0
Origin: Ubuntu
Maintainer: Ubuntu Developers <[email protected]>
Original-Maintainer: Debian MySQL Maintainers <[email protected]>
Bugs: https://bugs.launchpad.net/ubuntu/+filebug
Installed-Size: 1603 kB
Provides: virtual-mysql-server
Pre-Depends: adduser (>= 3.40), debconf, mysql-common (>= 5.5)
Depends: lsb-base (>= 3.0-10), mysql-client-8.0 (>= 8.0.28-0ubuntu4), mysql-common (>= 5.8+1.0.4~), mysql-server-core-8.0 (= 8.0.28-0ubuntu4), passwd, perl:any (>= 5.6), psmisc, debconf (>= 0.5) | debconf-2.0
Recommends: libhtml-template-perl, mecab-ipadic-utf8
Suggests: mailx, tinyca
Conflicts: mariadb-server-10.1, mariadb-server-10.3, mysql-server-5.7, virtual-mysql-server
Homepage: http://dev.mysql.com/
Task: lamp-server
Download-Size: 1386 kB
APT-Sources: http://archive.ubuntu.com/ubuntu jammy/main amd64 Packages
Description: MySQL database server binaries and system database setup
 MySQL is a fast, stable and true multi-user, multi-threaded SQL database
 server. SQL (Structured Query Language) is the most popular database query
 language in the world. The main goals of MySQL are speed, robustness and
 ease of use.
 .
 This package contains all the infrastructure needed to setup system
 databases.
mysql-server-8.0 vs mysql-server-core-8.0 package:
- mysql-server-8.0 – In almost all cases, you need this package. It contains MySQL database server binaries, clients and system database setup.
- mysql-server-core-8.0 – This package includes the server binaries but doesn’t contain all the infrastructure needed to set up system databases. So this one is more useful for those setting up Linux containers (Docker, LXD and co) and don’t need all the stuff like mysql clients.
Step 3 – Installing MySQL 8 server package
Let us install MySQL server version 8.0.28 on Ubuntu 22.04 LTS:
$ apt install mysql-server-8.0
Sample session:
Reading package lists... Done
Building dependency tree... Done
Reading state information... Done
The following package was automatically installed and is no longer required:
  libfreetype6
Use 'apt autoremove' to remove it.
The following additional packages will be installed:
  libcgi-fast-perl libcgi-pm-perl libclone-perl libencode-locale-perl libevent-pthreads-2.1-7 libfcgi-bin libfcgi-perl libfcgi0ldbl libhtml-parser-perl libhtml-tagset-perl libhtml-template-perl libhttp-date-perl libhttp-message-perl libio-html-perl liblwp-mediatypes-perl
  libmecab2 libprotobuf-lite23 libtimedate-perl liburi-perl mecab-ipadic mecab-ipadic-utf8 mecab-utils mysql-client-8.0 mysql-client-core-8.0 mysql-common mysql-server-core-8.0
Suggested packages:
  libdata-dump-perl libipc-sharedcache-perl libbusiness-isbn-perl libwww-perl mailx tinyca
The following NEW packages will be installed:
  libcgi-fast-perl libcgi-pm-perl libclone-perl libencode-locale-perl libevent-pthreads-2.1-7 libfcgi-bin libfcgi-perl libfcgi0ldbl libhtml-parser-perl libhtml-tagset-perl libhtml-template-perl libhttp-date-perl libhttp-message-perl libio-html-perl liblwp-mediatypes-perl
  libmecab2 libprotobuf-lite23 libtimedate-perl liburi-perl mecab-ipadic mecab-ipadic-utf8 mecab-utils mysql-client-8.0 mysql-client-core-8.0 mysql-common mysql-server-8.0 mysql-server-core-8.0
0 upgraded, 27 newly installed, 0 to remove and 0 not upgraded.
Need to get 28.6 MB of archives.
After this operation, 240 MB of additional disk space will be used.
Do you want to continue? [Y/n] y
Setting up a password for the root account
First, set up a password for the root account, run:
$ sudo mysql
Then set it up using the following syntax:
ALTER USER 'root'@'localhost' IDENTIFIED WITH mysql_native_password BY 'My7Pass@Word_9_8A_zE';
exit
MySQL 8.xx essentials config files and ports
- mysql.service – The service name. You can control it using the following systemctl command:
$ sudo systemctl start mysql.service

$ sudo systemctl stop mysql.service

$ sudo systemctl restart mysql.service

$ sudo systemctl status mysql.service - /etc/mysql/ – Main MySQL server configuration directory.
- /etc/mysql/my.cnf – The MySQL database server configuration file. Edit the .my.cnf ($HOME/.my.cnf) to set user-specific options. Additional settings that can override from the following two directories:
/etc/mysql/conf.d/

/etc/mysql/mysql.conf.d/ - TCP/3306 port – The TCP/3306 is the default network for the MySQL server and binds to 127.0.0.1 for security reasons. However, you can change it if you need VLAN or VPN CIDR access. Then you can access the MySQL server using the localhost socket set in the/run/mysqld/ directory.
Step 4 – Securing MySQL 8 server
There is no password by default, and other settings need to be tuned. Let us run the following command and set up and secure things for us:
$ sudo mysql_secure_installation
There is no password by default, and other settings need to be tuned. So let us run the following command and set up and secure things for us (look for my INPUT in red color):
Securing the MySQL server deployment.

Enter password for user root: My7Pass@Word_9_8A_zE

VALIDATE PASSWORD COMPONENT can be used to test passwords
and improve security. It checks the strength of password
and allows the users to set only those passwords which are
secure enough. Would you like to setup VALIDATE PASSWORD component?

Press y|Y for Yes, any other key for No: Y

There are three levels of password validation policy:

LOW    Length >= 8
MEDIUM Length >= 8, numeric, mixed case, and special characters
STRONG Length >= 8, numeric, mixed case, special characters and dictionary                  file

Please enter 0 = LOW, 1 = MEDIUM and 2 = STRONG: 2
Using existing password for root.

Estimated strength of the password: 100
Change the password for root ? ((Press y|Y for Yes, any other key for No) : Y

New password: My7Pass@Word_9_8A_zE

Re-enter new password: My7Pass@Word_9_8A_zE

Estimated strength of the password: 100
Do you wish to continue with the password provided?(Press y|Y for Yes, any other key for No) : Y
Next, I will remove an anonymous user, disable remote root login, and delete the test database:
By default, a MySQL installation has an anonymous user,
allowing anyone to log into MySQL without having to have
a user account created for them. This is intended only for
testing, and to make the installation go a bit smoother.
You should remove them before moving into a production
environment.

Remove anonymous users? (Press y|Y for Yes, any other key for No) : Y
Success.


Normally, root should only be allowed to connect from
'localhost'. This ensures that someone cannot guess at
the root password from the network.

Disallow root login remotely? (Press y|Y for Yes, any other key for No) : Y
Success.

By default, MySQL comes with a database named 'test' that
anyone can access. This is also intended only for testing,
and should be removed before moving into a production
environment.


Remove test database and access to it? (Press y|Y for Yes, any other key for No) : Y
 - Dropping test database...
Success.

 - Removing privileges on test database...
Success.

Reloading the privilege tables will ensure that all changes
made so far will take effect immediately.

Reload privilege tables now? (Press y|Y for Yes, any other key for No) : Y
Success.

All done!
Step 5 – Enabling the MySQL server at boot time
Make sure our MySQL server 8 starts when the system boots using the systemctl command:
$ sudo systemctl is-enabled mysql.service
If not enabled, type the following command to enable the server:
$ sudo systemctl enable mysql.service
Verify server status by typing the following systemctl command:
$ sudo systemctl status mysql.service
Step 6 – Starting/Stopping/Restarting the MySQL server
Using the command line option, we can control the MySQL server on Ubuntu 22.04 LTS. Let us start the server if not already running:
$ sudo systemctl start mysql.service
Stop the MySQL server, enter:
$ sudo systemctl stop mysql.service
Restart the MySQL server as follows:
$ sudo systemctl restart mysql.service
We can view the MySQL service log as follows using the journalctl command:
$ sudo journalctl -u mysql.service -xe
Outputs:
May 10 05:09:01 ubuntu-nixcraft systemd[1]: Starting MySQL Community Server...
░░ Subject: A start job for unit mysql.service has begun execution
░░ Defined-By: systemd
░░ Support: http://www.ubuntu.com/support
░░
░░ A start job for unit mysql.service has begun execution.
░░
░░ The job identifier is 597.
May 10 05:09:01 ubuntu-nixcraft systemd[1]: Started MySQL Community Server.
░░ Subject: A start job for unit mysql.service has finished successfully
░░ Defined-By: systemd
░░ Support: http://www.ubuntu.com/support
░░
░░ A start job for unit mysql.service has finished successfully.
░░
░░ The job identifier is 597.
The default error log file set to /var/log/mysql/error.log and one can view it using the tail command or query with grep /egrep command or use the cat/more and less commands:
$ sudo tail -f /var/log/mysql/error.log
Sample outputs:
2022-05-10T05:08:59.396952Z 7 [System] [MY-013172] [Server] Received SHUTDOWN from user boot. Shutting down mysqld (Version: 8.0.29-0ubuntu0.22.04.2).
2022-05-10T05:08:59.399628Z 0 [System] [MY-011323] [Server] X Plugin ready for connections. Bind-address: '127.0.0.1' port: 33060, socket: /var/run/mysqld/mysqlx.sock
2022-05-10T05:09:00.873507Z 0 [System] [MY-010910] [Server] /usr/sbin/mysqld: Shutdown complete (mysqld 8.0.29-0ubuntu0.22.04.2)  (Ubuntu).
2022-05-10T05:09:01.640964Z 0 [System] [MY-010116] [Server] /usr/sbin/mysqld (mysqld 8.0.29-0ubuntu0.22.04.2) starting as process 1463
2022-05-10T05:09:01.652378Z 1 [System] [MY-013576] [InnoDB] InnoDB initialization has started.
2022-05-10T05:09:01.771700Z 1 [System] [MY-013577] [InnoDB] InnoDB initialization has ended.
2022-05-10T05:09:01.942385Z 0 [Warning] [MY-010068] [Server] CA certificate ca.pem is self signed.
2022-05-10T05:09:01.942503Z 0 [System] [MY-013602] [Server] Channel mysql_main configured to support TLS. Encrypted connections are now supported for this channel.
2022-05-10T05:09:01.974967Z 0 [System] [MY-010931] [Server] /usr/sbin/mysqld: ready for connections. Version: '8.0.29-0ubuntu0.22.04.2'  socket: '/var/run/mysqld/mysqld.sock'  port: 3306  (Ubuntu).
2022-05-10T05:09:01.974988Z 0 [System] [MY-011323] [Server] X Plugin ready for connections. Bind-address: '127.0.0.1' port: 33060, socket: /var/run/mysqld/mysqlx.sock
Step 7 – Login into MySQL 8 server for testing purpose
So far, we have learned how to install, set up, secure, and start/stop the MySQL server version 8 on Ubuntu 22.04 LTS. Next, it is time to log in as a root (MySQL admin) user. The syntax is:
$ mysql -u {user} -p

$ mysql -u {user} -h {remote_server_ip} -p

$ mysql -u root -p
Sample session:
Enter password:
Welcome to the MySQL monitor.  Commands end with ; or \g.
Your MySQL connection id is 14
Server version: 8.0.29-0ubuntu0.22.04.2 (Ubuntu)

Copyright (c) 2000, 2022, Oracle and/or its affiliates.

Oracle is a registered trademark of Oracle Corporation and/or its
affiliates. Other names may be trademarks of their respective
owners.

Type 'help;' or '\h' for help. Type '\c' to clear the current input statement.
Next, run the STATUS command that displays the version and other info about your MySQL server:
STATUS;Outputs:
mysql  Ver 8.0.29-0ubuntu0.22.04.2 for Linux on x86_64 ((Ubuntu))

Connection id:		14
Current database:
Current user:		root@localhost
SSL:			Not in use
Current pager:		stdout
Using outfile:		''
Using delimiter:	;
Server version:		8.0.29-0ubuntu0.22.04.2 (Ubuntu)
Protocol version:	10
Connection:		Localhost via UNIX socket
Server characterset:	utf8mb4
Db     characterset:	utf8mb4
Client characterset:	utf8mb4
Conn.  characterset:	utf8mb4
UNIX socket:		/var/run/mysqld/mysqld.sock
Binary data as:		Hexadecimal
Uptime:			44 min 46 sec

Threads: 2  Questions: 22  Slow queries: 0  Opens: 140  Flush tables: 3  Open tables: 59  Queries per second avg: 0.008
--------------
We can see MySQL version as follows:
SHOW VARIABLES LIKE "%version%";
Outputs:
+--------------------------+-------------------------+
| Variable_name            | Value                   |
+--------------------------+-------------------------+
| admin_tls_version        | TLSv1.2,TLSv1.3         |
| immediate_server_version | 999999                  |
| innodb_version           | 8.0.29                  |
| original_server_version  | 999999                  |
| protocol_version         | 10                      |
| replica_type_conversions |                         |
| slave_type_conversions   |                         |
| tls_version              | TLSv1.2,TLSv1.3         |
| version                  | 8.0.29-0ubuntu0.22.04.2 |
| version_comment          | (Ubuntu)                |
| version_compile_machine  | x86_64                  |
| version_compile_os       | Linux                   |
| version_compile_zlib     | 1.2.11                  |
+--------------------------+-------------------------+
13 rows in set (0.00 sec)
Step 8 – Creating a new MySQL database and user/password
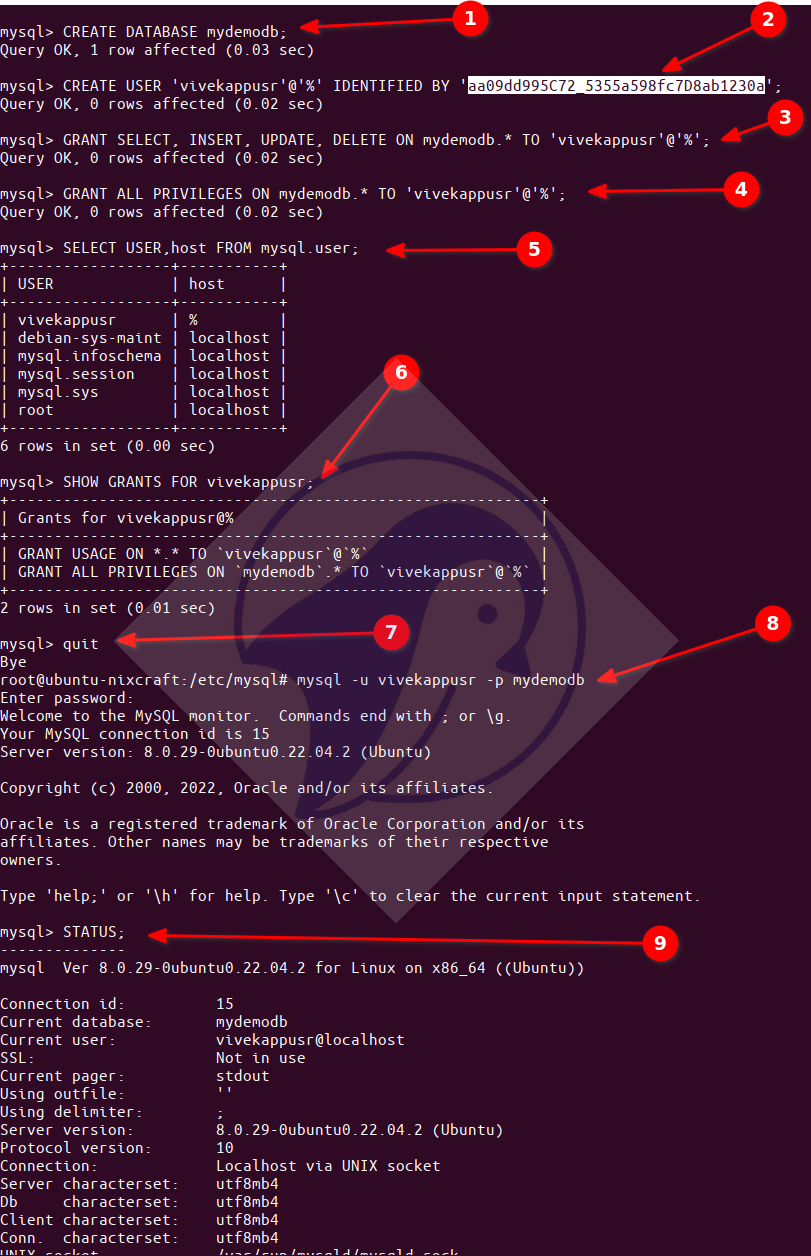
Let create a new database called mydemodb, type:
CREATE DATABASE mydemodb;
Next, I’m going to create a new user named ‘vivekappusr’ for our database called mydemodb as follows with password called ‘aa09dd995C72_5355a598fc7D8ab1230a’ as password:
CREATE USER 'vivekappusr'@'%' IDENTIFIED BY 'aa09dd995C72_5355a598fc7D8ab1230a';
Finally, give permissions:
GRANT SELECT, INSERT, UPDATE, DELETE ON mydemodb.* TO 'vivekappusr'@'%';
Of course, I can grant ALL PRIVILEGES too as follows:
GRANT ALL PRIVILEGES ON mydemodb.* TO 'vivekappusr'@'%';
See MySQL users and their grants:
SELECT USER,host FROM mysql.user;
SHOW GRANTS FOR vivekappusr;
Test it as follows:
$ mysql -u vivekappusr -p mydemodb

$ mysql -u vivekappusr -h localhost -p mydemodb
Where,
- -u vivekappusr : User for login
- -h localhost : Connect to host named localhost
- -p : Prompt for password
- mydemodb : Connect to database named mydemodb
Click to enlarge
Step 9 – MySQL 8 server configurations
Edit the /etc/mysql/mysql.conf.d/mysqld.cnf using a text editor. For instance:
$ sudo vim /etc/mysql/mysql.conf.d/mysqld.cnf
Add or edit under the mysqld] section and set default as per your needs (see https://dev.mysql.com/doc/ for detailed explanation regarding various config options):
[mysqld]
pid-file	= /var/run/mysqld/mysqld.pid
socket		= /var/run/mysqld/mysqld.sock
datadir		= /var/lib/mysql
log-error	= /var/log/mysql/error.log
Next, I am going to enable network access:
# server LAN/VLAN IP and port
bind_address = 10.147.164.6
port = 3306
skip_external_locking
skip_name_resolve
max_allowed_packet              = 256M
max_connect_errors              = 1000000
Fine tuning settings:
# InnoDB
default_storage_engine          = InnoDB
innodb_buffer_pool_instances    = 1
innodb_buffer_pool_size         = 512M
innodb_file_per_table           = 1
innodb_flush_log_at_trx_commit  = 0
innodb_flush_method             = O_DIRECT
innodb_log_buffer_size          = 16M
innodb_log_file_size            = 512M
innodb_stats_on_metadata        = 0
innodb_read_io_threads          = 64
innodb_write_io_threads         = 64

# MyISAM Settings (set if you are using MyISAM)
key_buffer_size                 = 32M

low_priority_updates            = 1
concurrent_insert               = 2

# Connection Settings
max_connections                 = 100

back_log                        = 512
thread_cache_size               = 100
thread_stack                    = 192K

interactive_timeout             = 180
wait_timeout                    = 180

# Buffer Settings
join_buffer_size                = 4M
read_buffer_size                = 3M
read_rnd_buffer_size            = 4M
sort_buffer_size                = 4M
Some table settings as per your needs:
# Table Settings (see below for open file limits)
table_definition_cache          = 40000
table_open_cache                = 40000
open_files_limit                = 60000

max_heap_table_size             = 128M
tmp_table_size                  = 128M

# Search Settings
ft_min_word_len                 = 3
Enable logging as per your needs too:
# Logging
log_error                       = /var/lib/mysql/mysql_error.log
log_queries_not_using_indexes   = 1
long_query_time                 = 5
slow_query_log                  = 0     # Disabled for production
slow_query_log_file             = /var/lib/mysql/mysql_slow.log
Tune mysqldum for backups:
[mysqldump]
quick
quote_names
max_allowed_packet
Setting up open files (number of file descriptors)
For a busy MySQL 8 server, you need to set up max open file settings using systemd. Otherwise, you will get an error Could not increase the number of max_open_files to more than XXXX. Hence, run:
$ sudo systemctl edit mysql.service
You will set the following text:
### Editing /etc/systemd/system/mysql.service.d/override.conf
### Anything between here and the comment below will become the new contents of the file


### Lines below this comment will be discarded
### /lib/systemd/system/mysql.service
# # MySQL systemd service file
#
# [Unit]
# Description=MySQL Community Server
# After=network.target
#
# [Install]
# WantedBy=multi-user.target
#
# [Service]
# Type=notify
# User=mysql
# Group=mysql
# PIDFile=/run/mysqld/mysqld.pid
# PermissionsStartOnly=true
# ExecStartPre=/usr/share/mysql/mysql-systemd-start pre
# ExecStart=/usr/sbin/mysqld
# TimeoutSec=infinity
# Restart=on-failure
# RuntimeDirectory=mysqld
# RuntimeDirectoryMode=755
# LimitNOFILE=10000
#
# # Set enviroment variable MYSQLD_PARENT_PID. This is required for restart.
# Environment=MYSQLD_PARENT_PID=1
So add your config between:
### Anything between here and the comment below will become the new contents of the file


### Lines below this comment will be discarded
For example (replace with 1800000 with your desired value. For max supported value use LimitNOFILE=infinity instead of LimitNOFILE=1800000):
### Editing /etc/systemd/system/mysql.service.d/override.conf
### Anything between here and the comment below will become the new contents of the file
[Service]
LimitNOFILE=1800000


### Lines below this comment will be discarded

### /lib/systemd/system/mysql.service
# # MySQL systemd service file
#
# [Unit]
# Description=MySQL Community Server
# After=network.target
#
# [Install]
# WantedBy=multi-user.target
#
# [Service]
# Type=notify
# User=mysql
# Group=mysql
# PIDFile=/run/mysqld/mysqld.pid
# PermissionsStartOnly=true
# ExecStartPre=/usr/share/mysql/mysql-systemd-start pre
# ExecStart=/usr/sbin/mysqld
# TimeoutSec=infinity
# Restart=on-failure
# RuntimeDirectory=mysqld
# RuntimeDirectoryMode=755
# LimitNOFILE=10000
#
# # Set enviroment variable MYSQLD_PARENT_PID. This is required for restart.
# Environment=MYSQLD_PARENT_PID=1
Create or edit the /etc/sysctl.d/100-custom.conf and add:
fs.nr_open=1800000
Update the changes:
$ sudo sysctl -p /etc/sysctl.d/100-custom.conf
Then reload and restart the mysql service:
$ sudo systemctl daemon-reload

$ sudo systemctl restart mysql
Verify it:
$ mysql -u root -p -e 'SHOW GLOBAL VARIABLES LIKE "open_files_limit";'
Sample outputs:
+------------------+---------+
| Variable_name    | Value   |
+------------------+---------+
| open_files_limit | 1800000 |
+------------------+---------+
Summing up
And there you have it, Oracle MySQL server version 8.x set up and running correctly on Ubuntu Linux 22.04 LTS server. Further, you learned how to add a new database, user, password, and fine-tune server config for your project. See Oracle MySQL database docs for SQL and other commands.